News items
April 2025
I am still way behind with work, the jobs suffering most are the ones that take time, the easy ones tend to get preference to get them off the bench. The last year has been nothing but problems with things needing repair, replacement and generally tidying or sorting out. This includes my boiler, washing machine, kitchen lights which seem to be the most unreliable ever, my wife's car, my bike, the lathe and all sorts of other things.
I had to rebuild the lathe with a new servo motor, much better than the 180v dc motor it had before but all new motor mounts had to be made to fit it. I also had to replace the gib strips on the top slide and cross slide as the Chinese ones were a poor fit and made of cast iron, the new ones fit as they should and are bronze. I also needed a 4 jaw chuck for it which is not available except from Germany at a ridiculous price, I bought a Chinese one with the wrong fittings and a face plate with the right fittings and machined the face plate to fit the chuch.
I decided that I was getting too old for the Moto Guzzi 1200 Stelvio that I currently own, its heavy (just short of 600 lbs), doesn't like short trips and has had running issues for the last year. I opted for a Triumph Tiger 800, 100 lbs lghter, much the same performance, of the same style and it seemed great when I test rode it. However it did not grow on me over the next week or so, it has a clunky gear change, a whiney engine and a front brake that does not perform and feels like squeezing a block of wood. All these things are as they come and cannot be improved so I have now decided that it was not a good move and will be preparing if for sale in the next couple of weeks. After much research and a breakthrough on the Guzzi I have replaced the engine and air temperature sensors and its a lot happier now, both were reading too high a temperature so the computer thought I was riding across the Sahara and adjusted settings to suit. It now realises that I am in England where the tremperature rarely gets over 25C, unlike the 55C that the airsensor was telling it.
May 2024
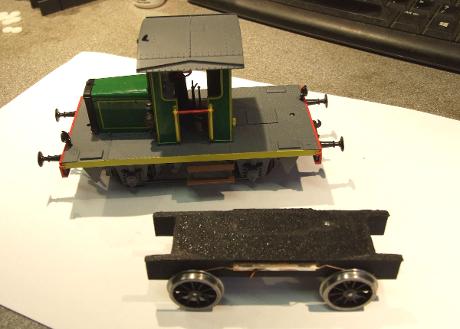
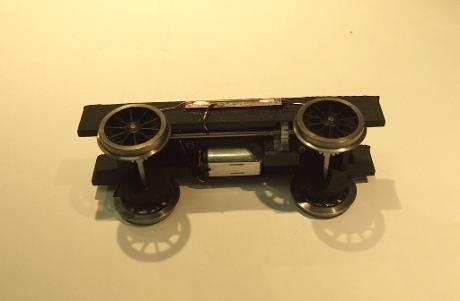
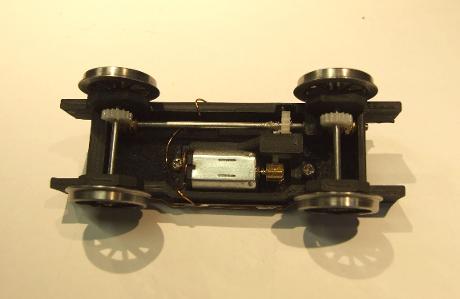
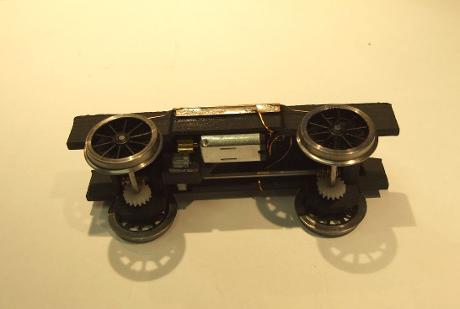
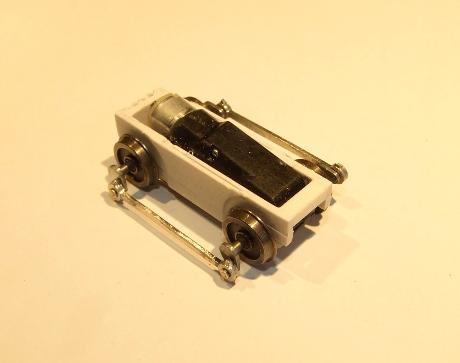
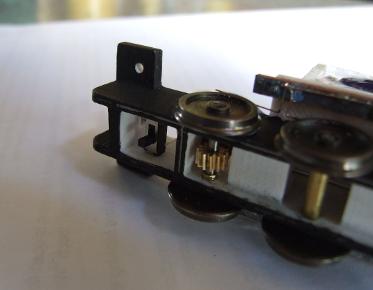
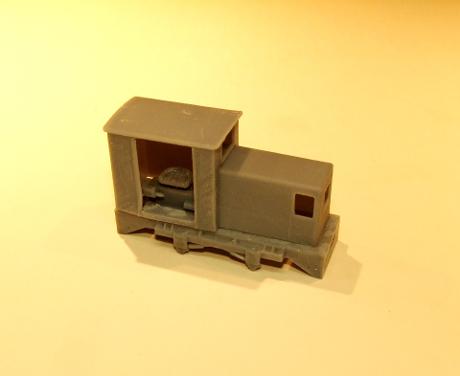
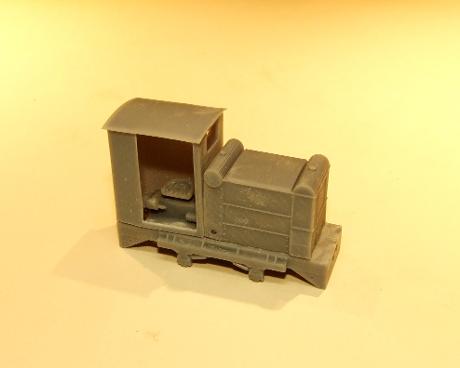
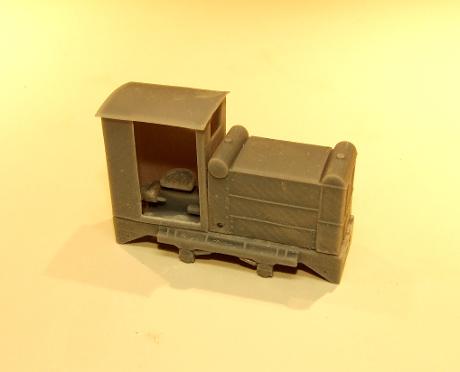
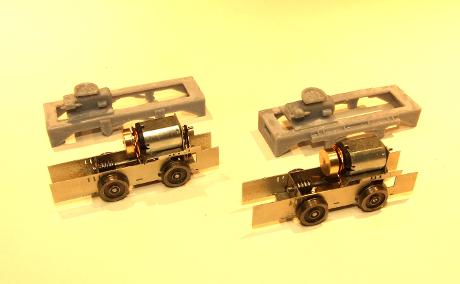
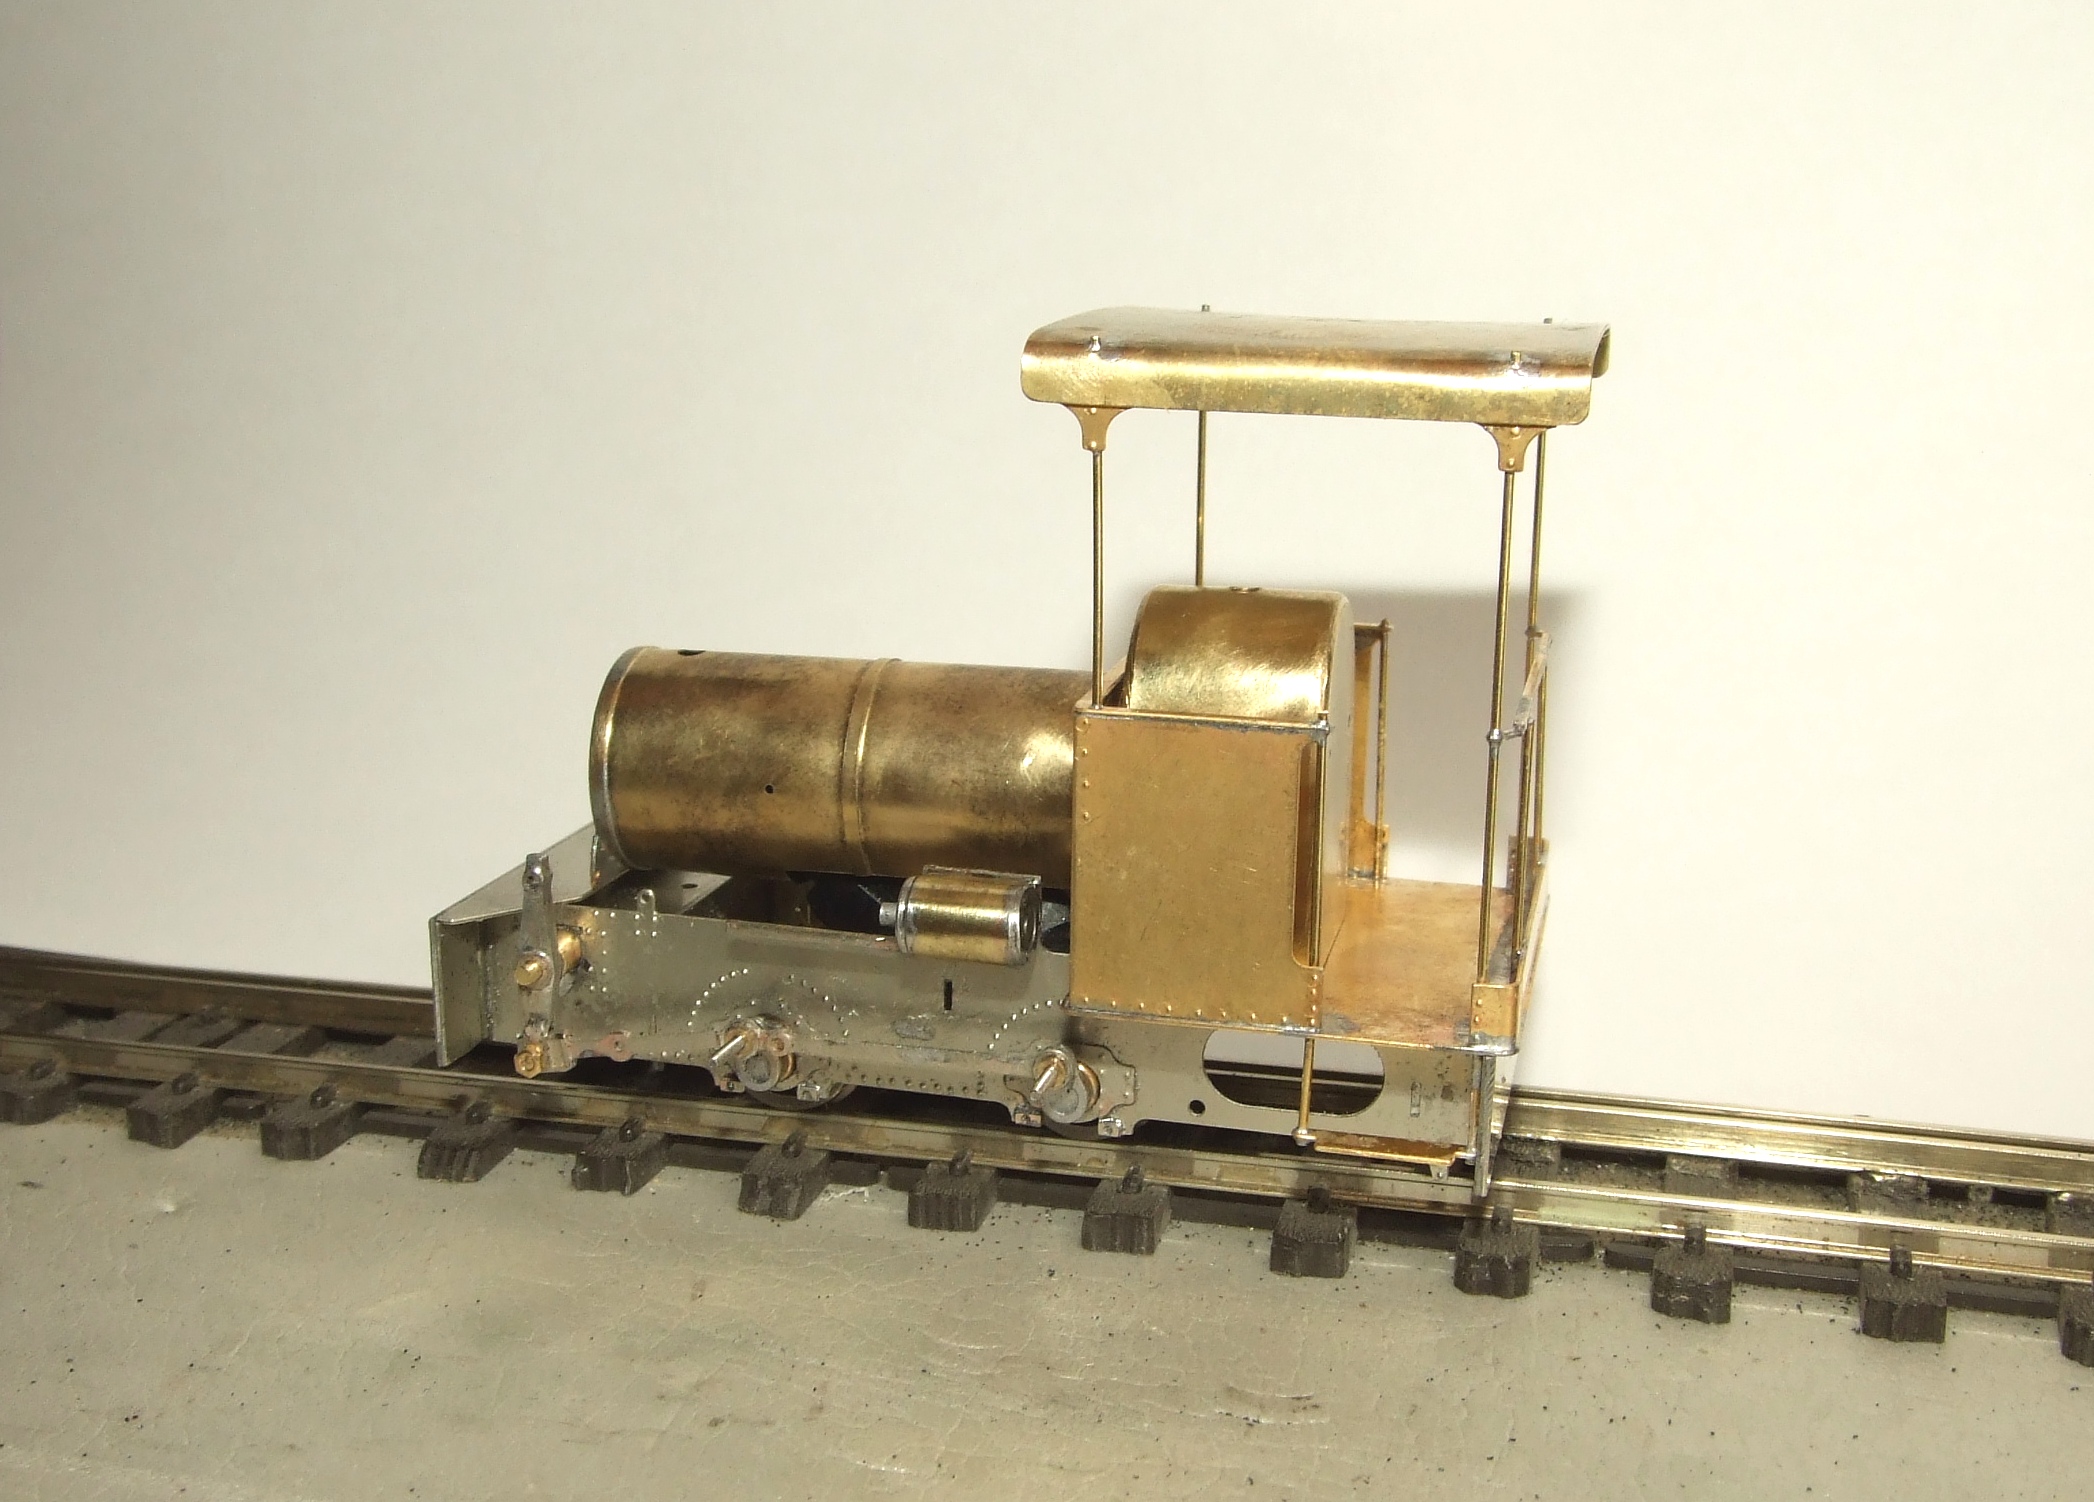
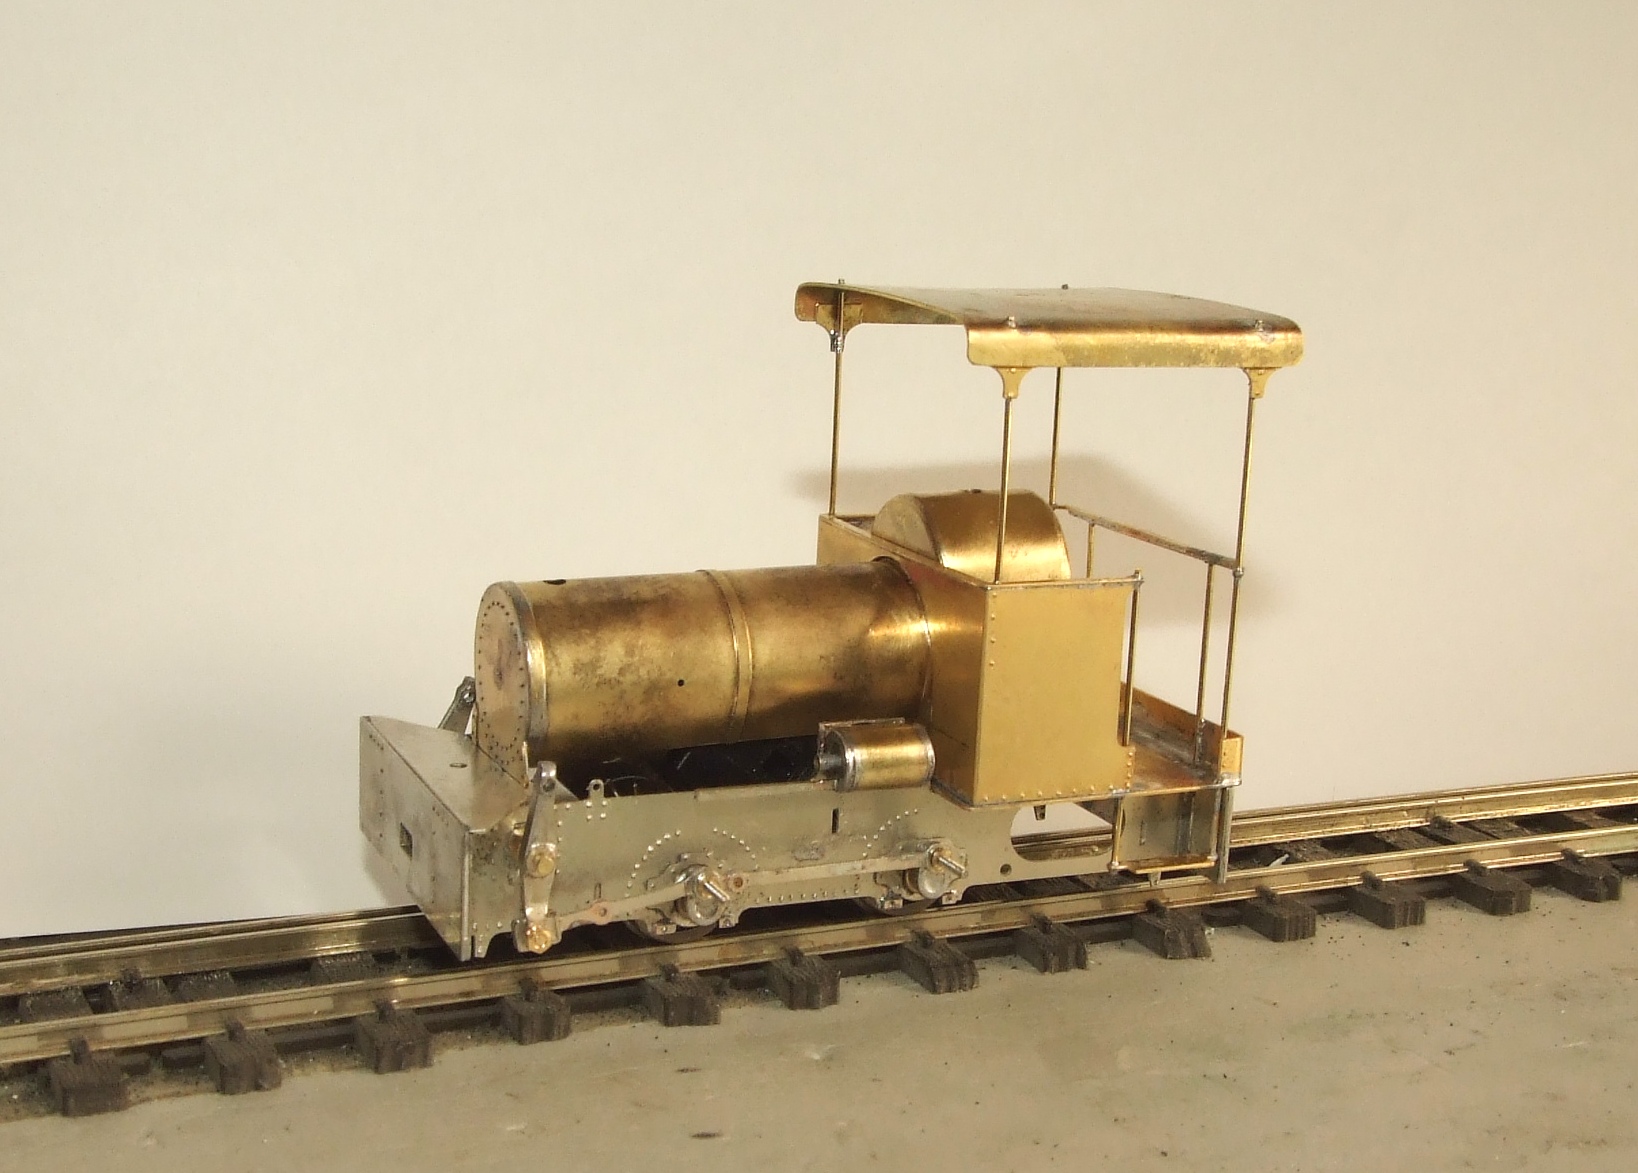
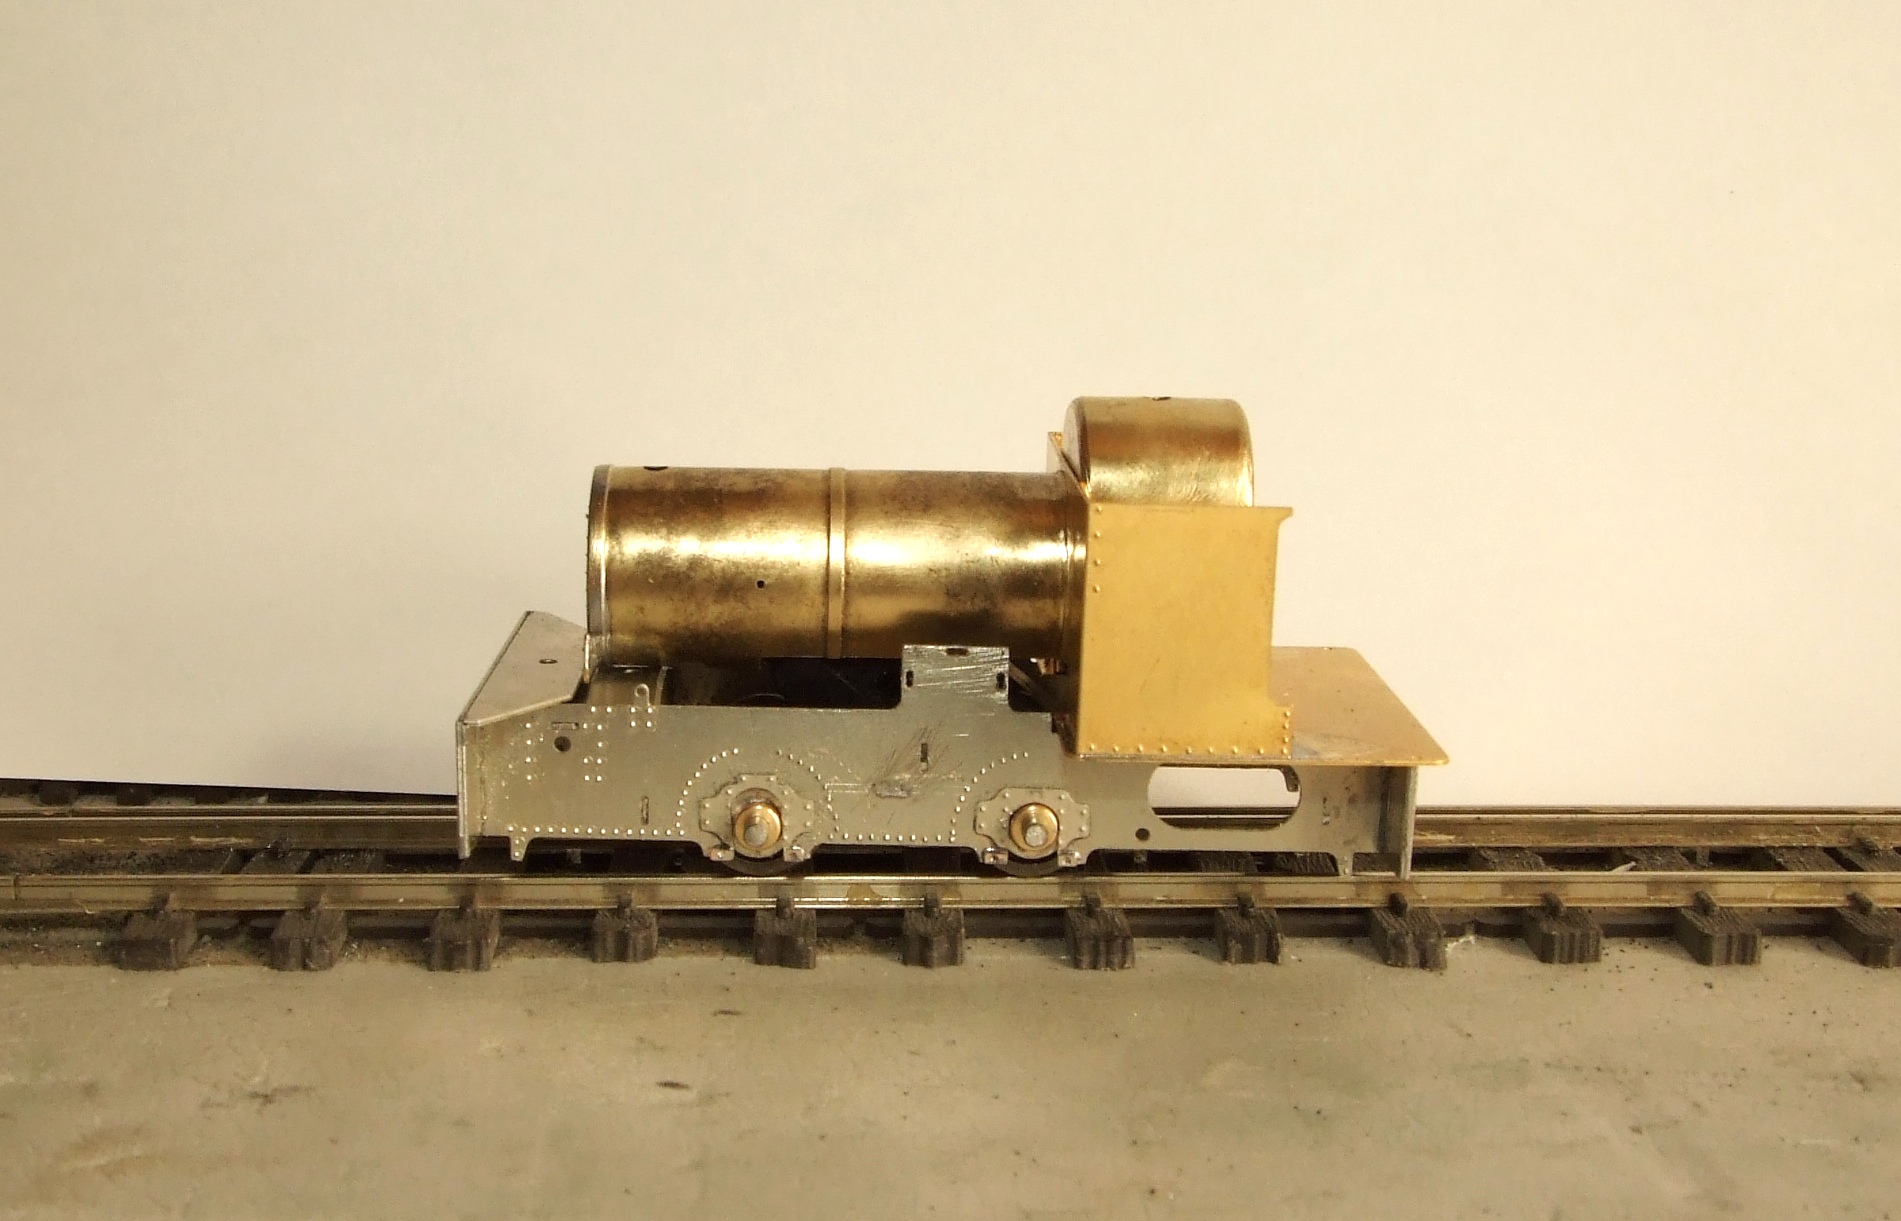
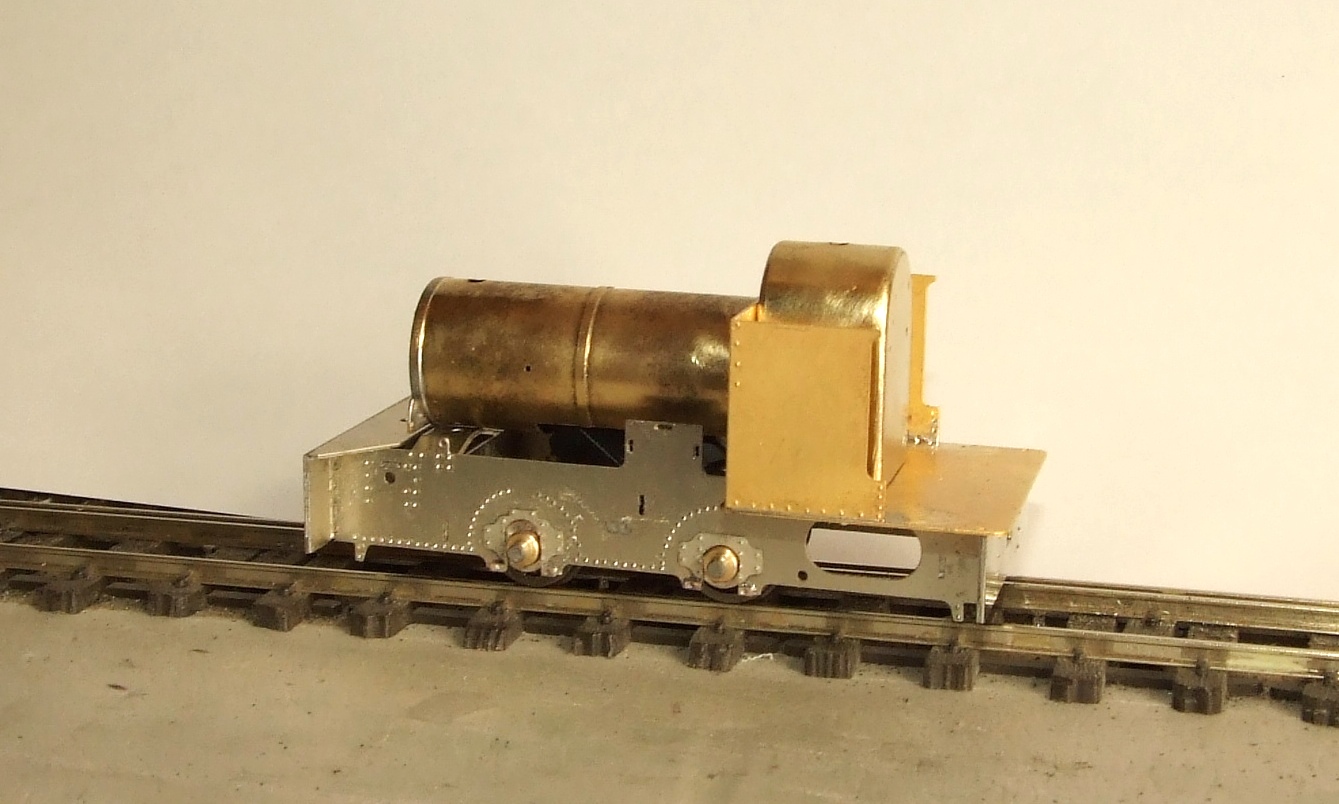
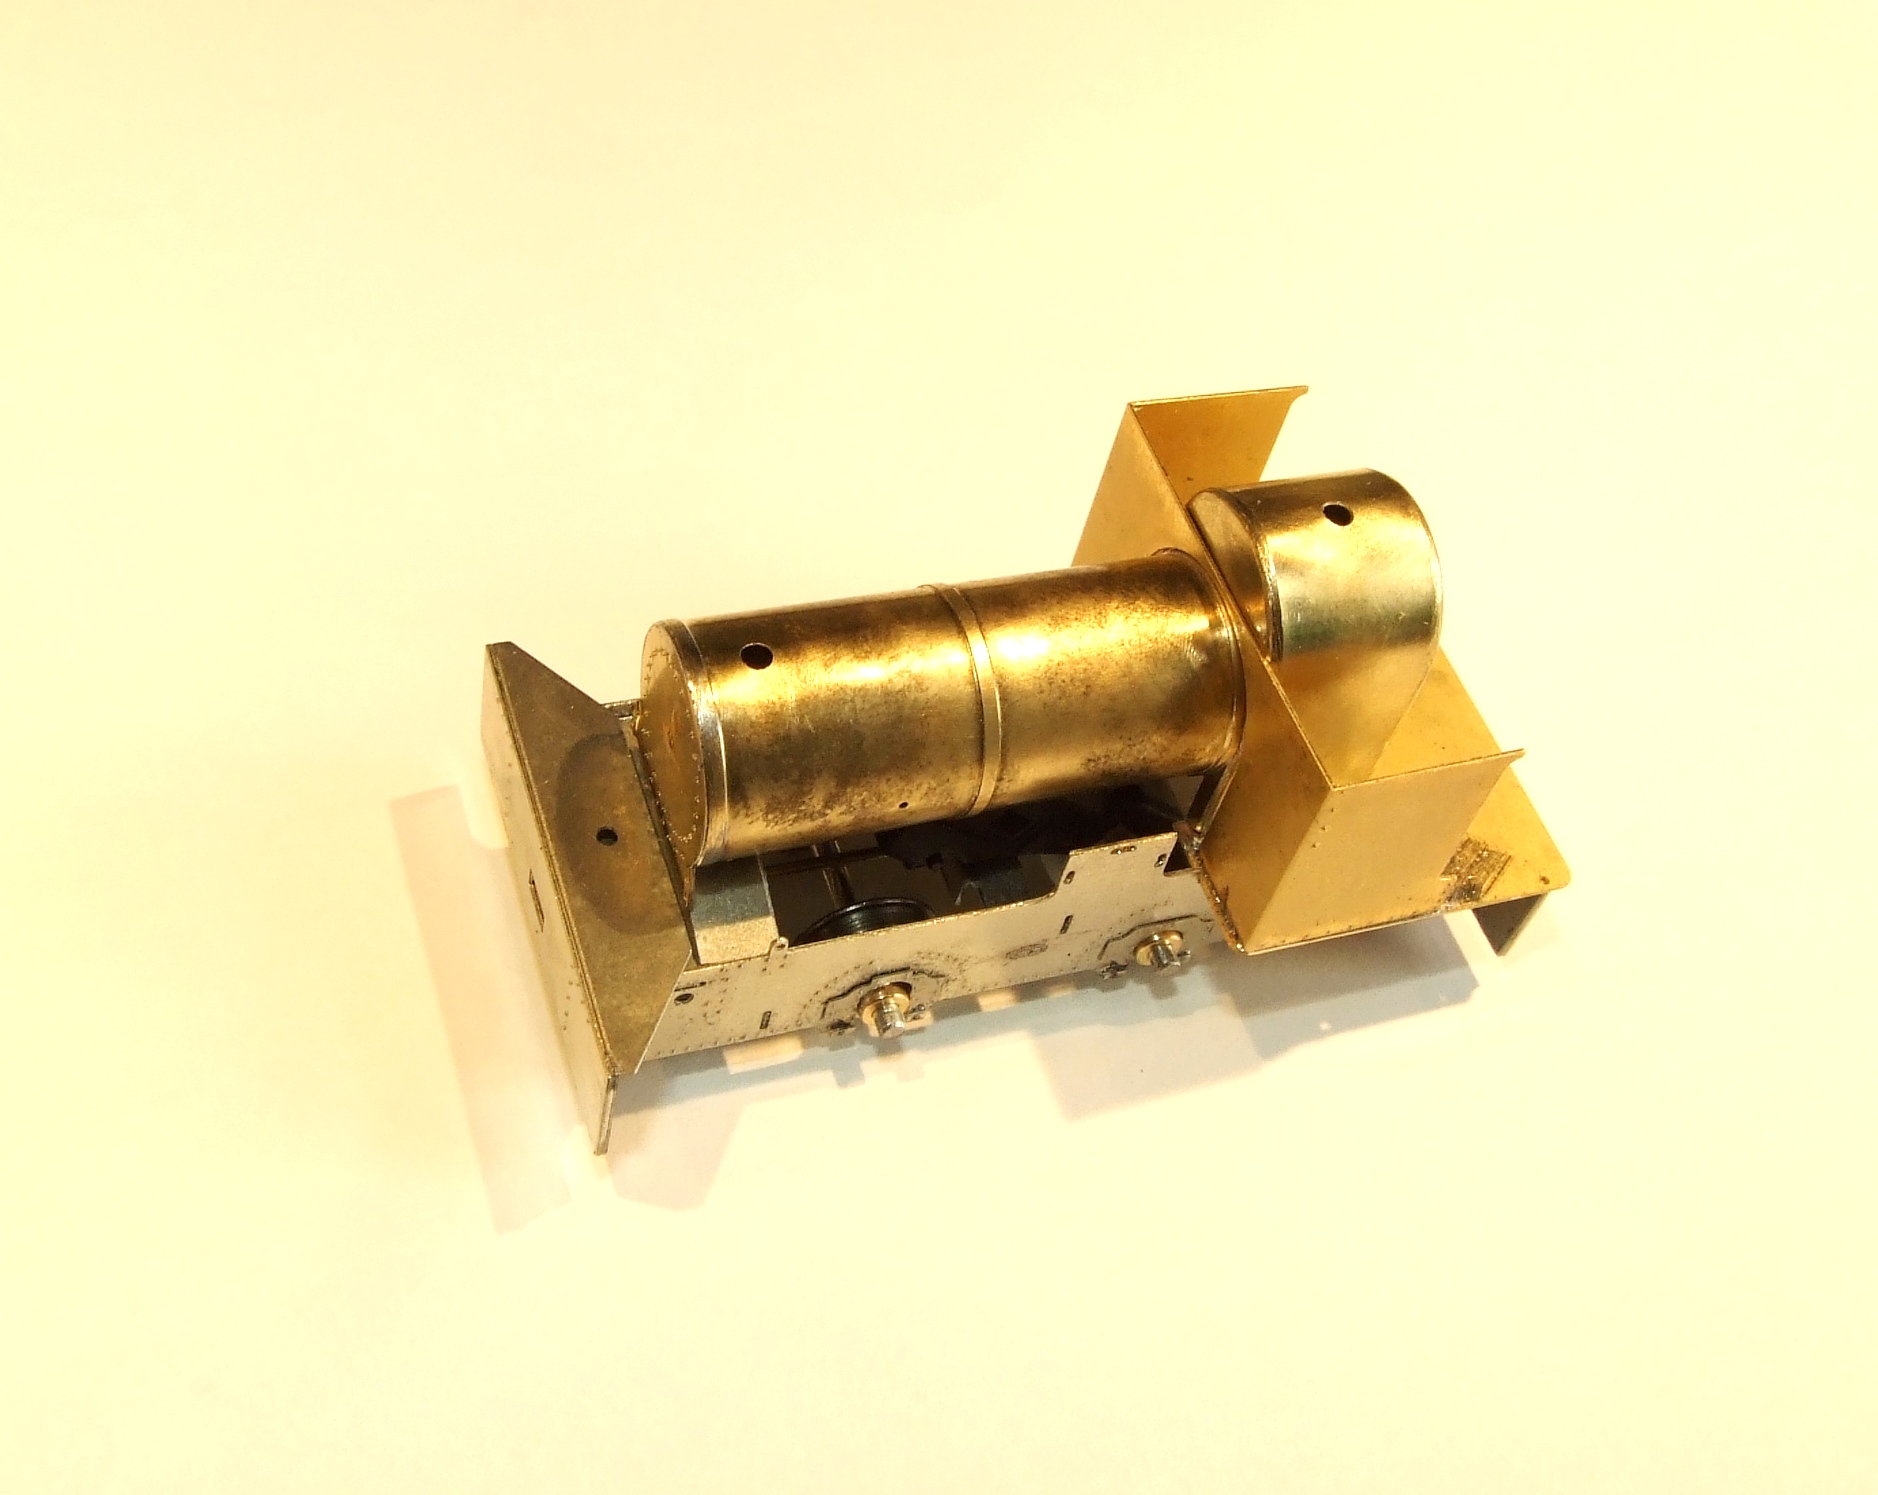
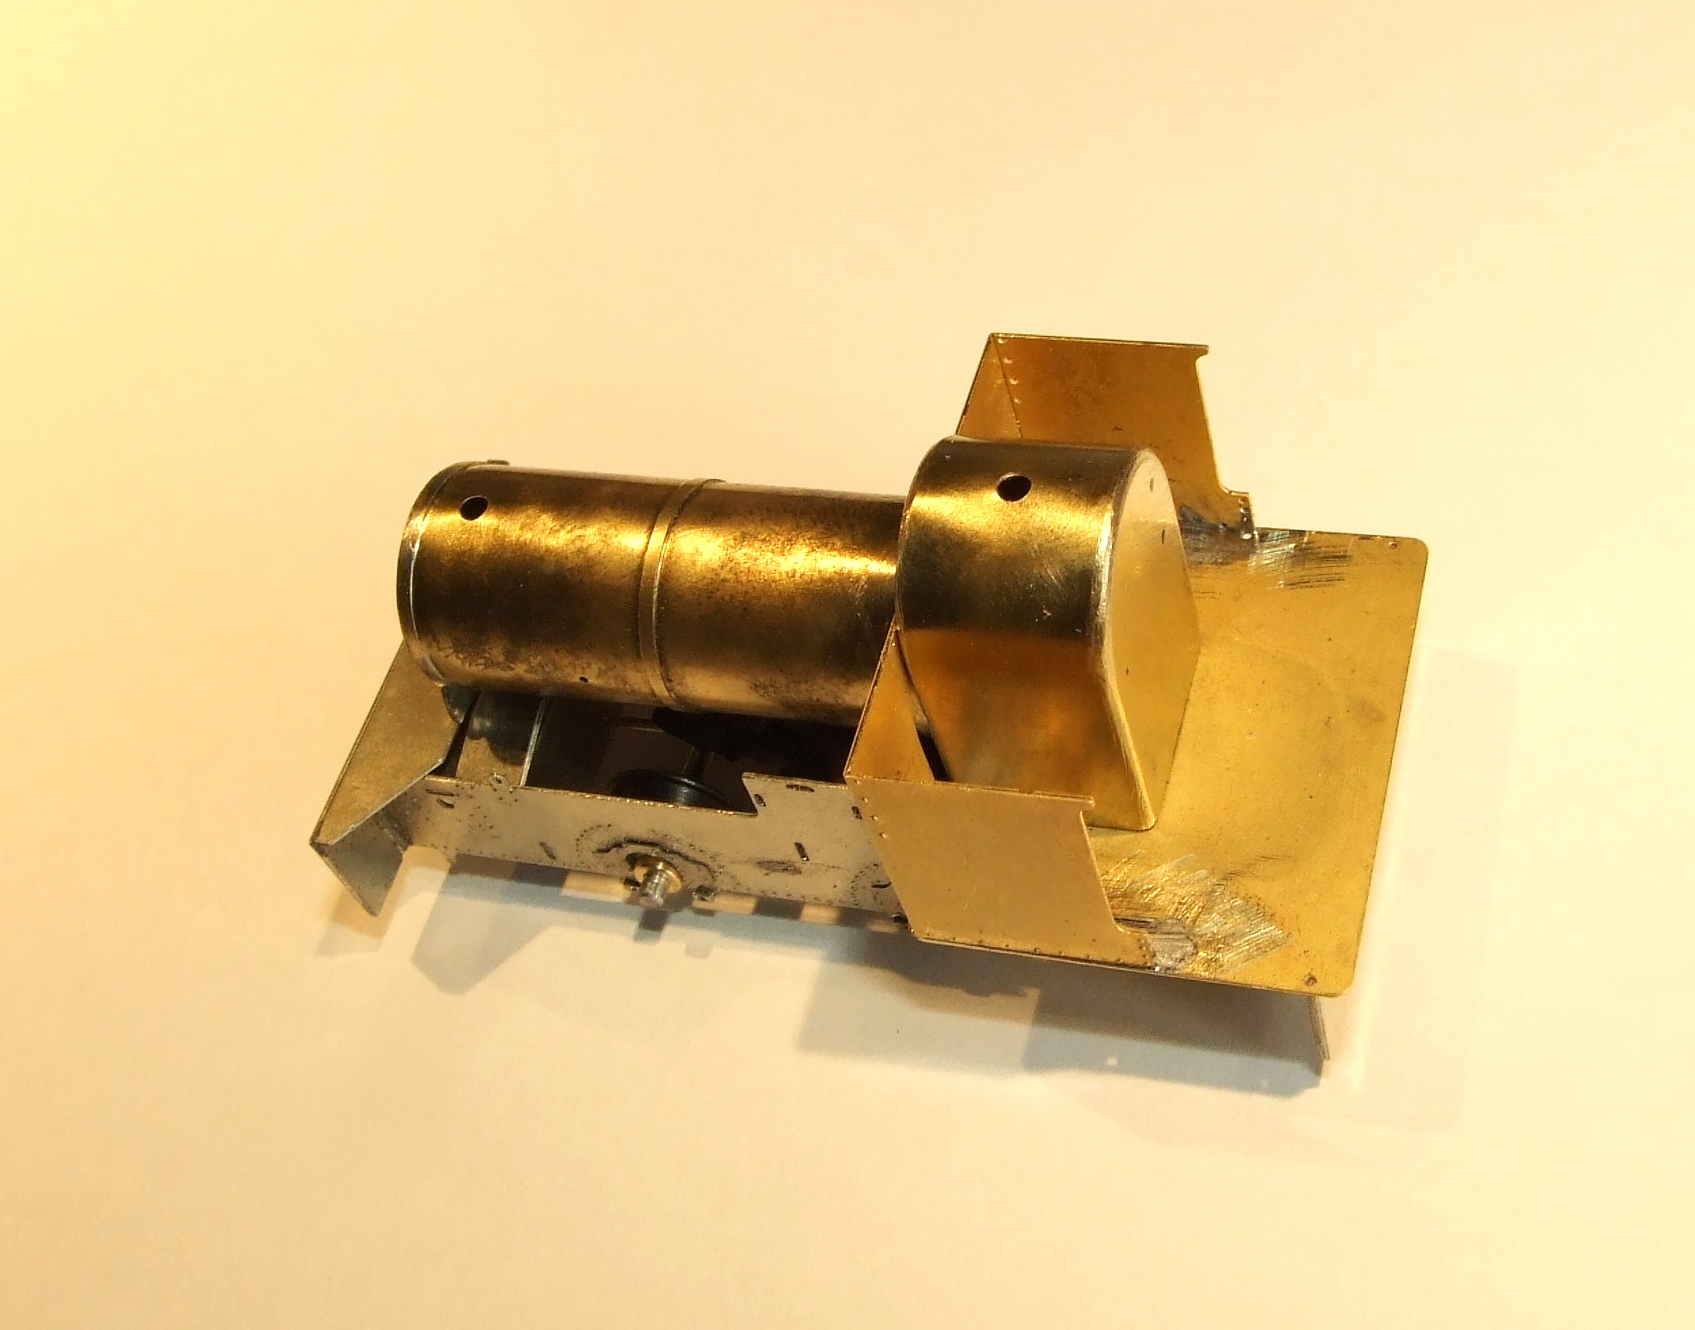
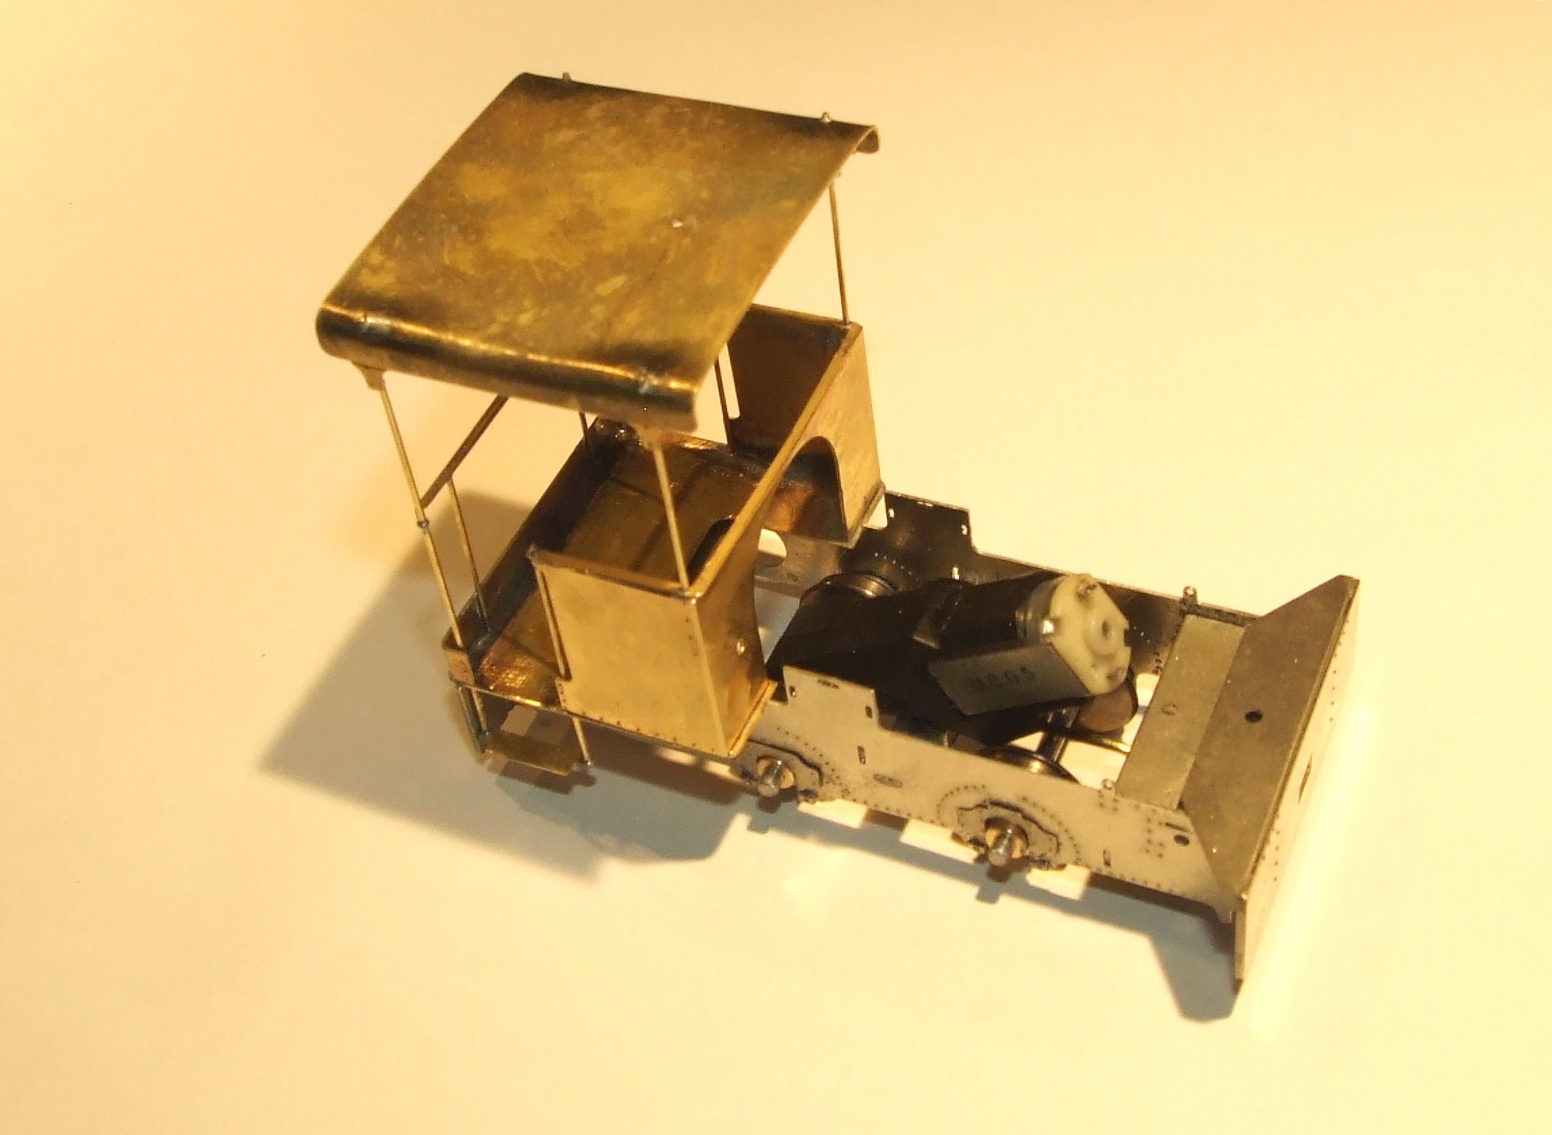
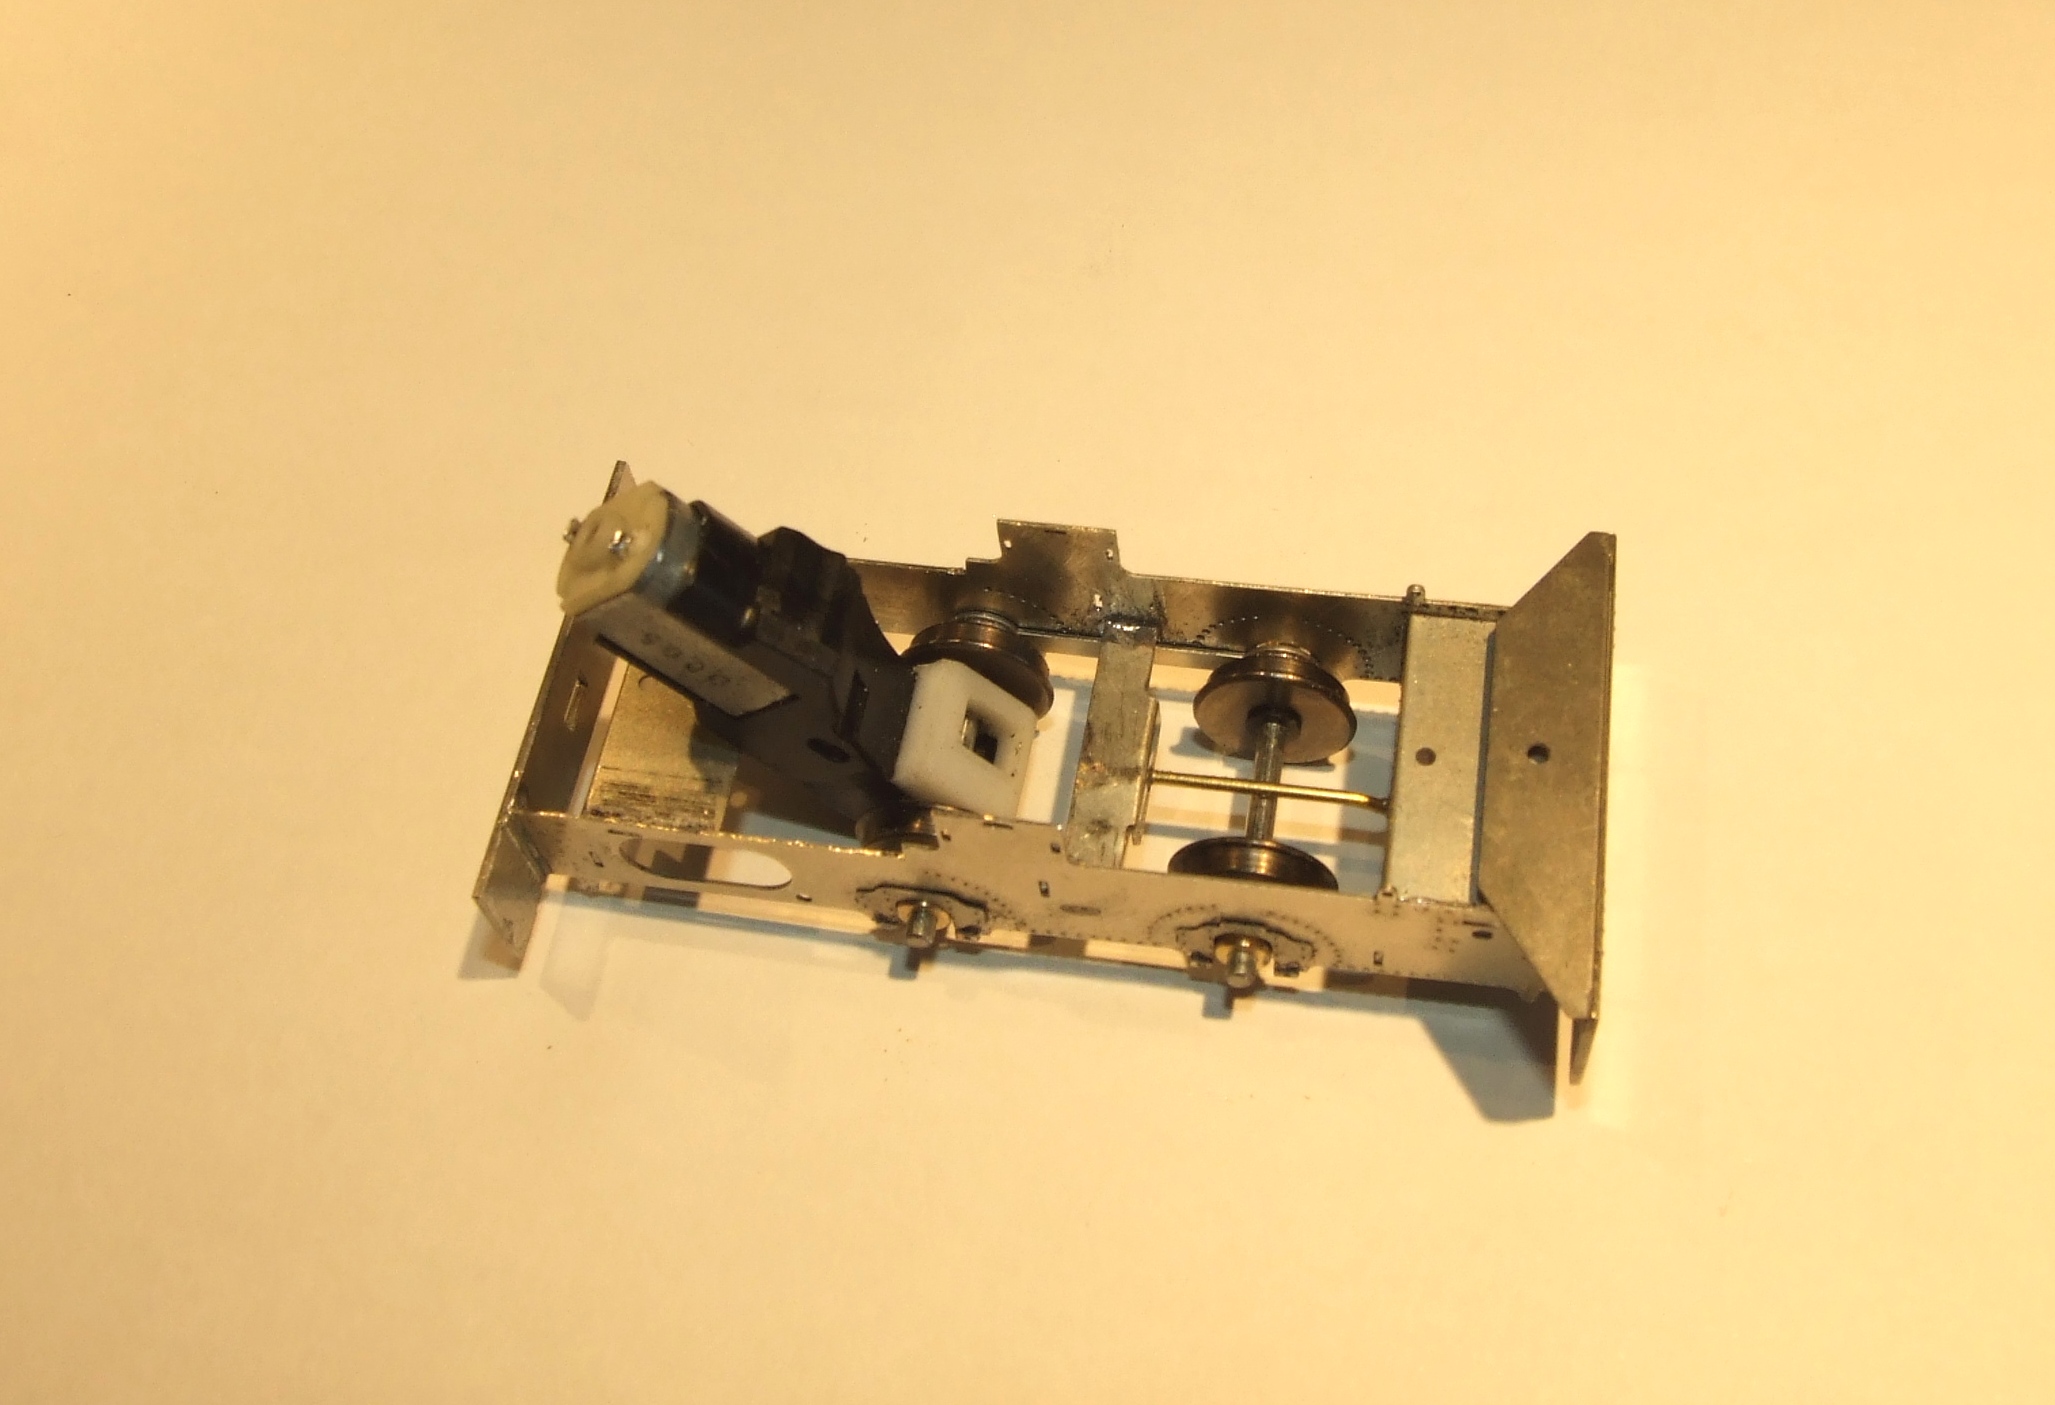
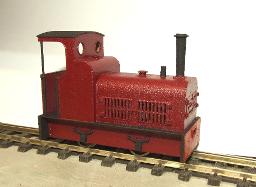
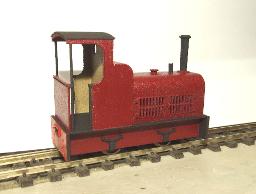
I finally got the first Berliet chassis finished, see pictures below. It uses 10 spoke Slaters wheels, an all gear drive at 51:1, an odd number but because of the odd gear sizes I had to use. Its still a bit fast but controlable, a slower option would be to switch the N30 motor for an 8/16 coreless which runs at about half the speed. This is easy as the motor and first gear reduction is in a carrier held in with 2 screws, so its about a 10 minute job. The drive shaft is offset to one side but I still had to add a bulge to the other side to get the motor in. Its about as discreet as I can make it and the next job is to see how much of the donor loco needs to be removed to fit it. I currently need 5 of these, 3 for me and 2 for customers, one of which was given to me in dismantled form so I have a good base to work with. The price is likely to be around £100 as they are slow to build and use wheels a lot more costly than mine, if you want to supply the loco and have it fitted, ask me for a price but it won't be cheap. I will add pictures of the modified parts before and after fitting the chassis for those who want to do it themselves.
The Berliet chassis works but is incredibly noisy so has been shelved for a while until I find time to redesign it into a quieter format.
December 2025 - new geared motors
Most of the geared motors I have been selling have recently become unavailable but I have found a replacement, see the motors page for details.
And now for something completely different
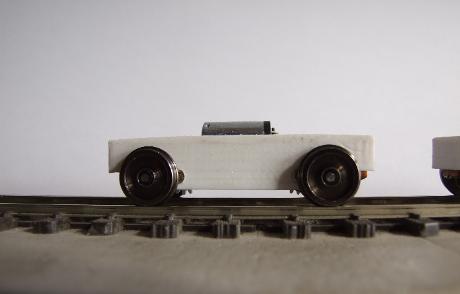
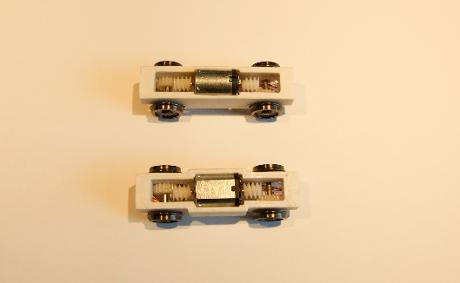
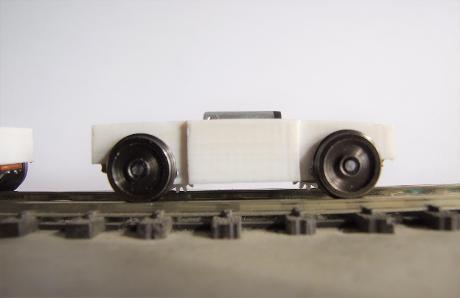
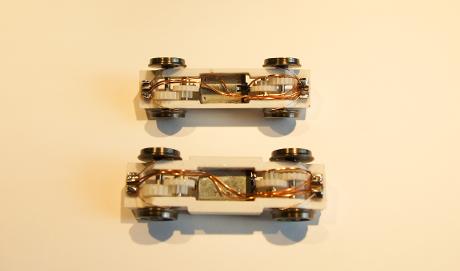
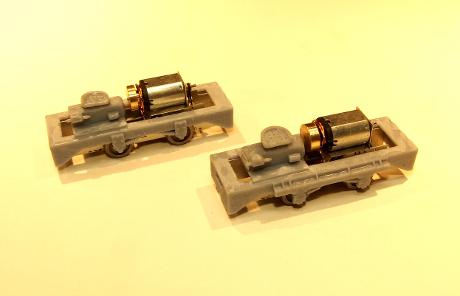
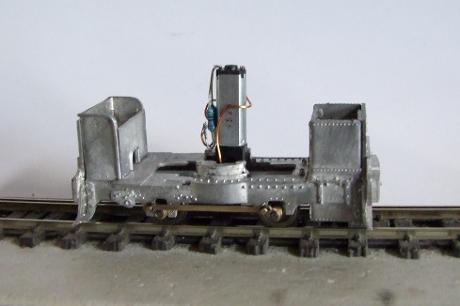
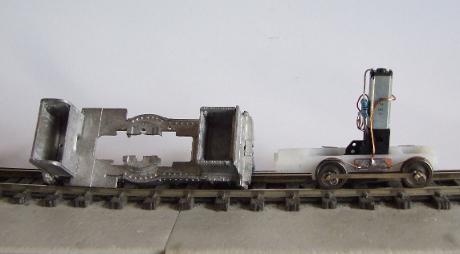
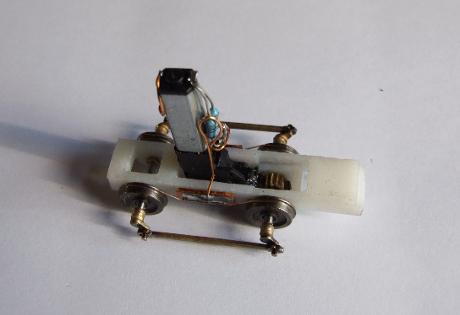
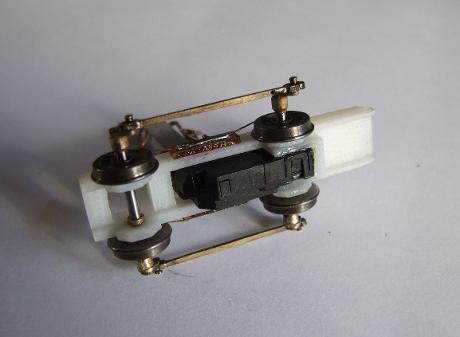
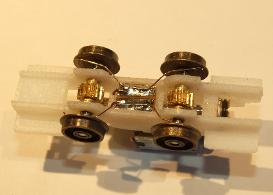
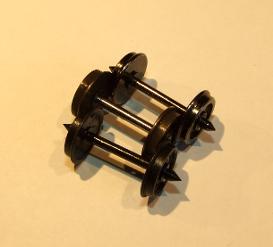
A customer asked for a pair of chassis with a 56mm wheelbase and 14mm wheels, not difficult in principle but too long for a central motor driving both ends. The solution is shown below, they are a lengthened dual geared chassis with twin motors, each motor drives with a 32:1 ratio onto its own axle and the motors are wired in series to keep the voltage down for slow speeds. They run very well but there was no reason they shouldn't as this works in articulated locos with a seperate drive at each end, these 2 drives justhappen to be in the same chassis. These are to go under a pair of Japanese On-2 1/2 railcars, I will no doubt find out soon if they work or not.

WD H type water wagon
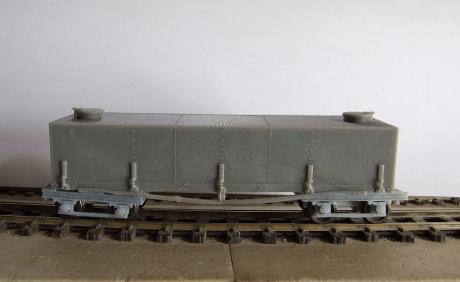
A new addition to the range, see the Wagon and Coach page for details.
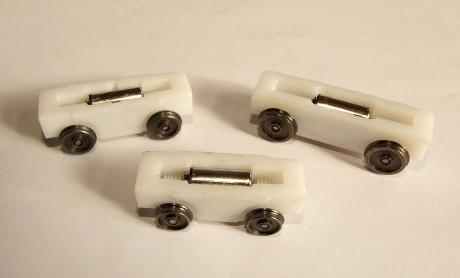
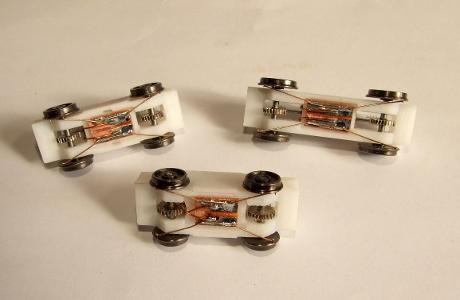
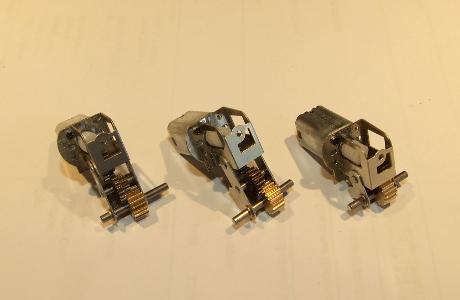
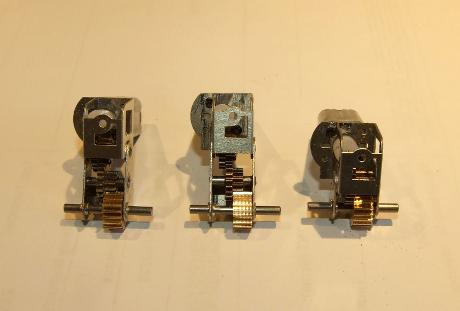
Tenshodo Replacement Power Bogie MK2
This is much the same as the original printed item but now uses a coreless motor with 24:1 gearing. This gives them slower running compared with the regular item with 13:1 gears as the motor is slower revving and the gearing is nearly twice the ratio. This also allows use of 14 or even 16mm wheels, something not really possible with the 13:1 N20 type. On top of this, the height of the motor in the print is lower and allows room for a top plate with a central pivot screw if required, not actually shown in the 2 pictures here but one will be included with each bogie sold. The 3 shown in the pictures are 25mm wb with 9.5mm wheels, 28mm wb with 10.5mm wheels and 25mm wb with 12mm wheels. These coreless motors are quieter and smoother than the N20 used previously and use a lot less power so are better suited to DCC and radio control.
Available now at the slightly higher price of £54.00 as the motors are more costly.
If anyone wants one of the three shown in the pictures, they are going spare as they were built as a test for the motors and have no actual planned use, I can change the wheels if you want a different size.
Someone is bound to ask why I don't use the 24:1 gears in the regular ones, I have done several times, particularly if someone wants one with 12 or 14mm wheels.
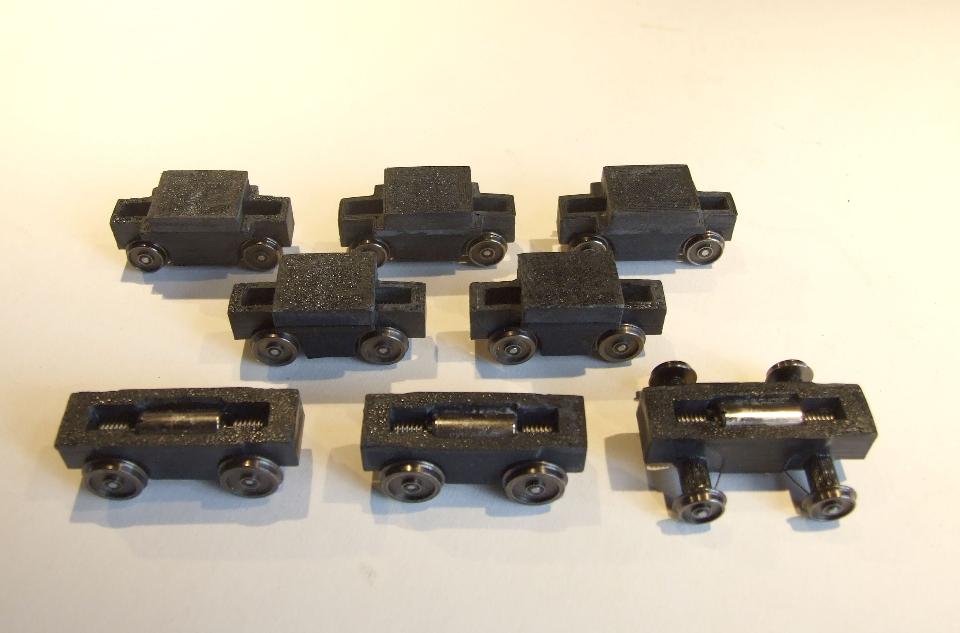
April 2025
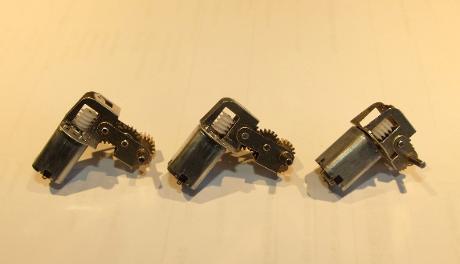
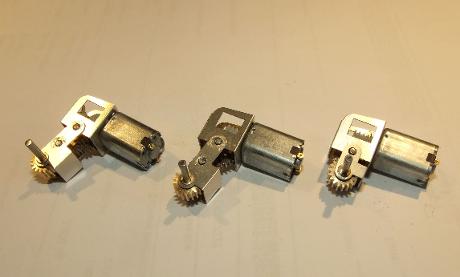
A picture of a batch of chassis and bogies I built a few days ago, the 3 at the rear are Halling Replacements 30-12-9.5 designed to drop in to the space a Halling fits in. The middle row are a pair of Halling Replacements for 25-12-10.5, built in error and will be for sale at Burton in 2025. The front are a pair of OO bogies without their pivots for 28-16.5-12 and 25.5-16.5-12, these are for a railcar and a trailer which have different wheelbases. The odd one front right is for an O gauge Wickham Trolley and if someone is waiting for one of these, please contact me as I have lost your emails and details.
Ransomes & Rapier chassis
If you have spotted this little loco on Ebay and lusted after one, only to find it is for O9, fear not as I had a word with the maker Paul Smith who kindly informed me that it will take 14mm gauge wheels as is and made a modified version for 16.5mm. I have now drawn chassis for 16.5, 14 and 12mm gauges which are available on the Motor Bogies page.
Limited amount of brass wheelsets
Recently acquired in from redundant EM scale stock and suitable for rolling stock or small diesels or electic locos, see Motor Bogies, Motors and Wheels pagefor details.
Gearboxes
An all new range of 0.4M gearboxes in 3 types, a 2 stage 36:1 and 3 stage 50:1 and 65:1. All use common parts and are similar to other makes to assemble, the main difference being that the main part folds into a strong box shape which is unlikely to flex or buckle under load. The lower section can be pivoted on the first shaft to around 45 degrees either way, up to 60 degrees if a little is filed from the main housing. All gears are brass and the worm is nylon, shafts, bushes and spacing washers are supplied. They will take most common motors and include diagonal holes for the awkward Chinese ones. Also included is a bracket to solder over the motor holes for driving from a shaft when using a remote motor, there is a hole in the other side on all 3 to take the other end of the shaft, I can supply bushes for this fitting method on request.
In the pictures the 65:1 is left, 50:1 center and 36:1 right, all are shown with a 10mm square motor with diagonal holes (motor not included). The final drive gear is for a 2mm shaft and needs to be locked to the axle with threadlock. They cannot take 1/8th axles as the next gear is too close to the axle, the solution for this is 2mm - 1/8th sleeves on the axle ends, I will be making these available. These will become standard issue in my kits as the existing stock is used up.
Dimensions are -
Final drive gear - 8mm diameter
Maximum width - 9.5mm
Motor offset to one side + 3 - 5mm depending on motor
Height - 65:1 19mm, 50:1 19.5mm and 36:1 12.5mm. This is measured from the motor center to the axle center with the lower link vertical, at 45 degrees it is 16mm, 16.5mm and 11mm in the same order as above.
These gearboxes are easy to assemble and come with the shafts cut to length, they also run extremely smoothly as all tolerances are built in so no adjusting or setting up to do. The only soldering required is the bushes and the joint after folding the main frame. The worm is push fit and the double gears are loose on fixed axles, the final gear is held by threadlock.
These will sell at £14.00 for the 2 stage 36:1 and £18.00 for the 3 stage 50 or 65:1, if you buy a motor at the same time I will apply a 50% discount to the motor. I have only just test built the etches and have only a few gears at the moment so I can only supply a few gearbox kits right now but more gears are on the way and stock should be here in early April 2022.
The stock order for gears arrived in April but the worms went missing in the post, they have been reordered but might not arrive until June 2022. I have very few left but I can put your name on a list to call when available if you want one.
New chassis
The latest one is called the Big Diesel Bogie (BDB), it is a little bigger than the Larger Diesel Bogie (LDB) but is just as adaptable to fit almost anything. It can be built to wheelbases from 24 to 45mm and gauges from 12 to 21mm, it comes with a choice of wheels, motor and a flywheel if possible. The etch also comes with a pivot for use as a bogie rather than a fixed chassis, these are the 2 strips on the left of the etch, the longer one for use if it has to fit round the motor on short bogies.
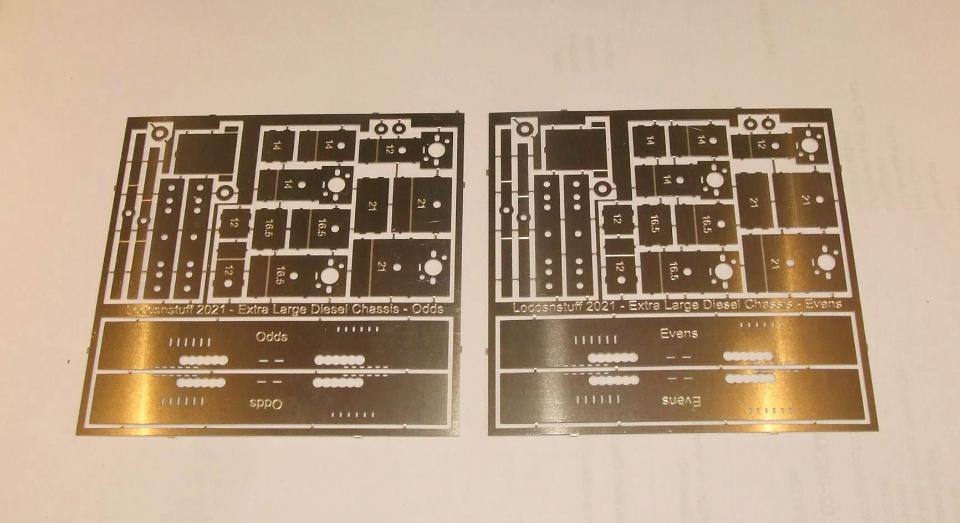
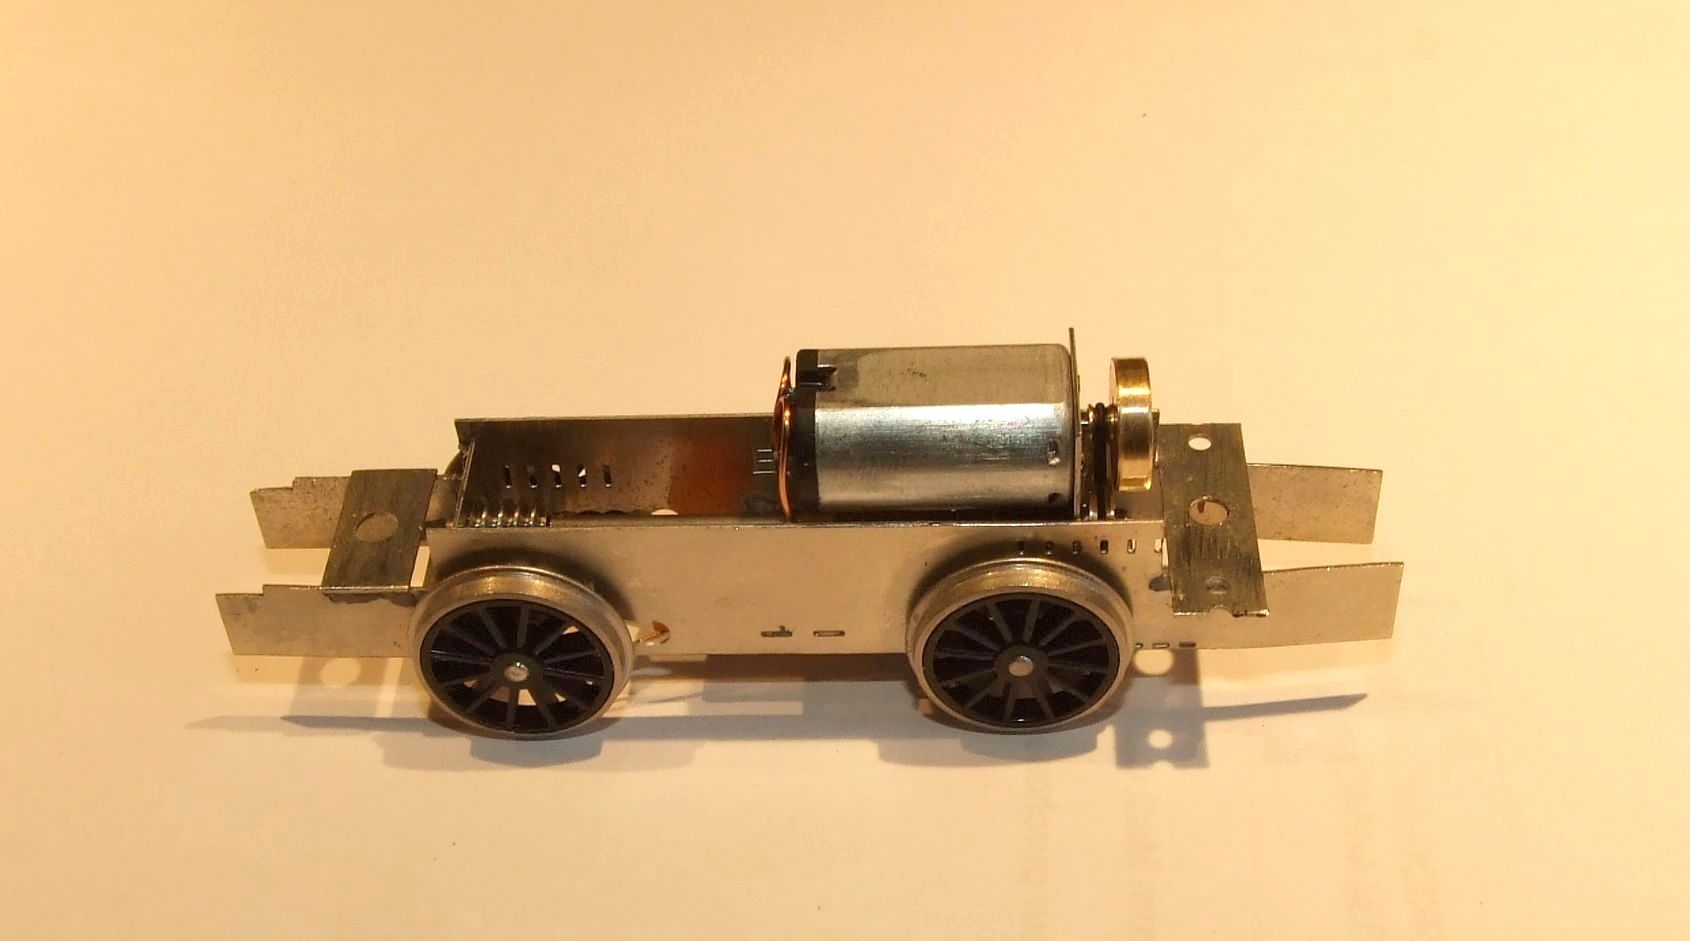
There are 2 etches for even numbers of wheelbase mm and for odds, you get one not both. They are easy to build but do require soldering. The picture below is a test build modified to fit an S&D Dick Kerr with cut down ends. The motor in this one is an N30 and the wheels are Scalelink 16mm.
These will sell at £50.00 as a kit plus an extra £40.00 for a built one. There may also be an extra cost if the wheels are bought in from another supplier. I have a few available now but there will be more in April when I get the stock order of etches.
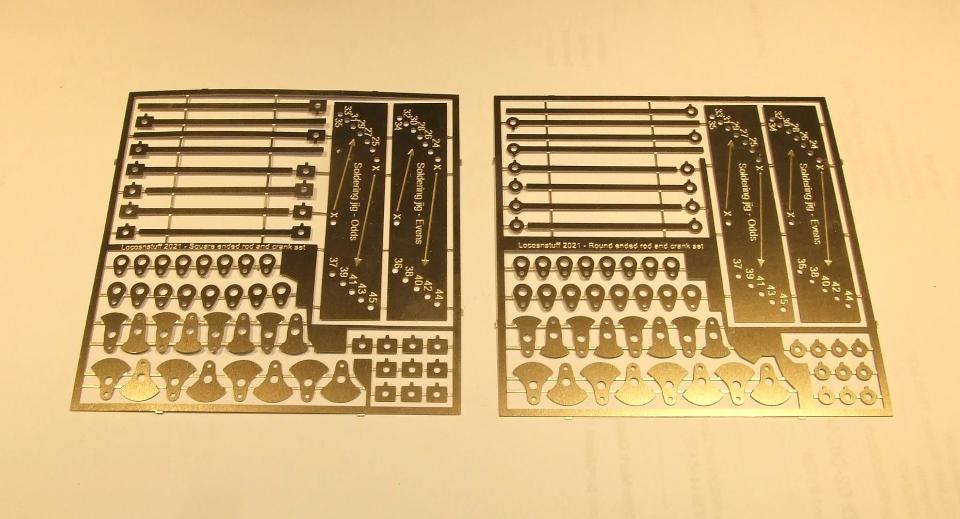
Outside rods and cranks
These etches are to go with the BDB above or the LDB, in fact any chassis with 2mm axles. There are 2 etches again for round ended or square ended rods, you get 4 styles of cranks used as double layers and and parts to make 4 coupled outside rods. There are also 2 jigs to help with assemby. Also included are matching connecting rods for use with anything requiring a jackshaft drive, or even a steam chassis.
Below is my test use of them on a 3D printed chassis for a Wrightlines DeWinton, I used the smallest cranks and had to make my own holes in the jig for the awkward wheelbase of 30.5mm! The rods layer up to be double thickness with cosmetic bosses added for thickness. I can also supply longer axles if needed as the standard ones are usually too short.
These etches will sell for £18.00 and come with crankpins and threaded bushes.
Tebee Models body prints
Tom Bell is living in France and since Brexit his prints from Shapeways have gone up and up in price. A solution is for someone in the country that wants to buy them to print and distribute them, I can do this and supply a suitable chassis to go with them. Currently I have drawings for 20 US style Critters, all using the same chassis but with an assortment of various body parts above. Some are based on prototypes, some are freelance, you pick the one you want.
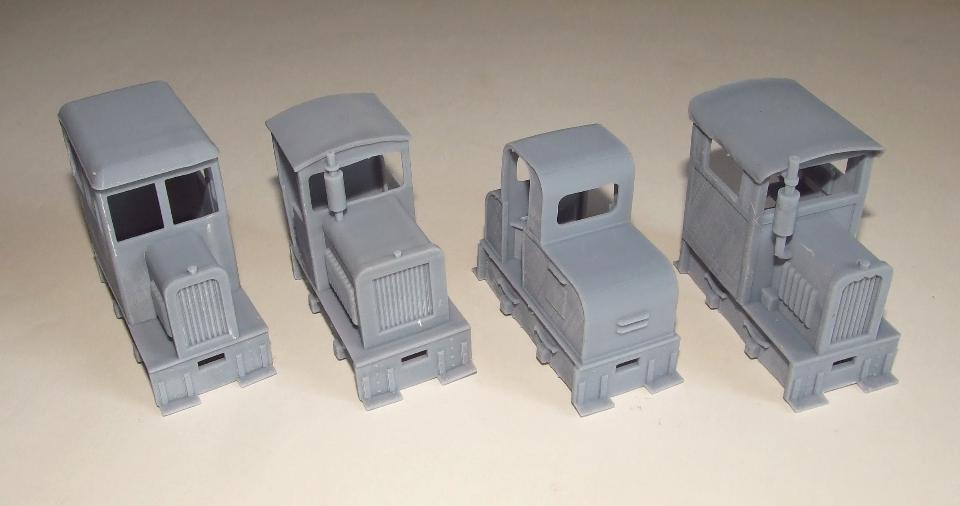
These are 4 bodies that I printed as a trial, the range includes 3 open cab types, 2 US style box cabs, and center cabs, more pictures will be added when I have the bodies on hand to photograph. All will use my Larger Diesel Bogie which can be built to gauges from 9 to 16.5mm. The price will be £85.00 for any body with a chassis kit, and an extra £40.00 if you want the chassis built.
Tinning self stripping enameled wire
I am using this in all my kits as it is far easier to use, it stays where you put it, is solid enough to act as a motor brace and is quicker to use. Some people have experienced difficulties in stripping the enamel so this is how I do it.
The iron must be hot, if you have temperature control, turn it to 400C or more, this is often the maximum on adjustable irons but solder stations usually go higher, mine does 480C. Cut the wire into the lengths required, dip the ends 2 at a time into paste flux, melt some solder onto the iron and apply it to the side of the wire but right at the end. The flux will fizz and the enamel will bubble up and turn black. After doing both wires, wipe with a tissue and the remaining flux and burnt enamel will come off leaving nicely tinned ends.
If you try this and fail, either your iron is not hot enough, you need more flux or you are applying the iron to the enamel only. The idea is that the solder tins the tip of the wire and spreads up under the enamel, burning it off as it does. Make sure that the blob of solder is big enough to cover the last 1mm of the wire and the bare copper end and it will work, a flat iron bit works better than a pointed one.
Gears for Bachmann Gas Mechanical
I recently bought a job lot of On30 stuff on Ebay, including a rough Gas Mechanical. On dismantling it turned out to have a split gear on 1 axle. Bachmann UK said no, ask bachmann USA, who can supply them but only a complete set of all gears for around $11.00 plus shipping, vat and duty, I would not get much change from £20.00.
Examination showed that they are 0.4M 14 tooth so I hunted through the Chinese suppliers and found some brass ones and duly ordered a pack of 10. They fit and work perfectly so if anyone else has had the same problem and needs a pair of gears, they will cost you £4.00 with postage. I have sold all the gears Ioriginally ordered and when the replacements turned up, they sent me 12 tooth! More are on order but might not get here until late April.
Unfortunately they are not that easy to install, this is the procedure, 1 - Remove the crankpins, side rods and pull off the cranks. 2 - Remove the keeper plate and both axles. 3 - Remove the wheels by standing the axles on end and pushing a wheel down using pliers behind the plastic bush, remove the gear in a similar manner. 5 - Using broaches open out the hole in the new gear until it just fits the plain axle, not the knurled part. If you have a vertical drill, predrill it 2.9mm and just broach the last bit. 6 - The gear must be forced onto the knurled part, I used a vertical drill with the axle end in a hole so the chuck left loose pushed the gear into place. Note that it is not central, the face of the gear should be 3.5mm from one end of the 3mm thick part and 5.5mm from the other. 7 - refit the wheels and the axles into the chassis with the keeper plate. 8 - refit the cranks with the right side 90 degrees ahead of the left, it doesn't have to be accurate as long as the cranks on each side match each other, then refit the rods and crankpins.
If this is all too much I will do it for you but it will cost £30.00 plus gears and postage.
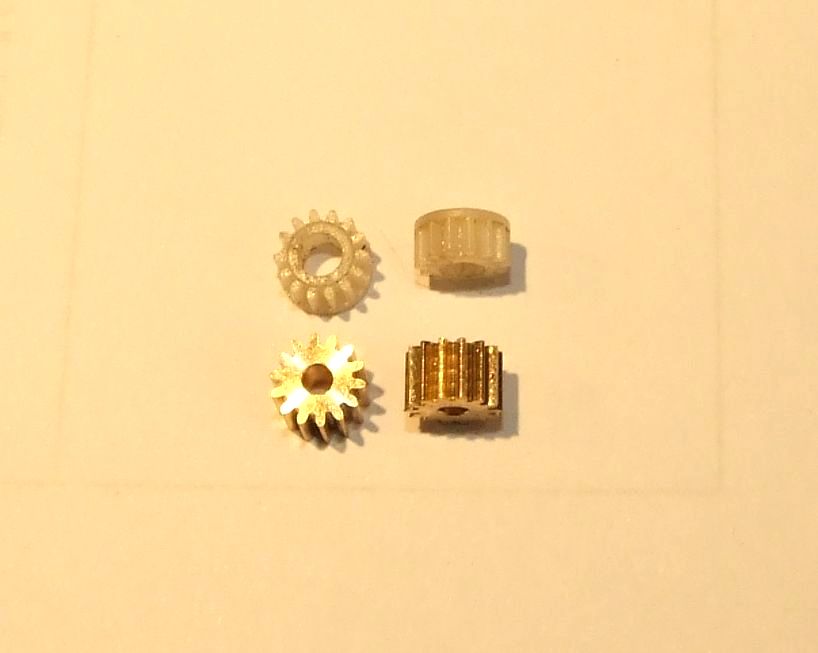
The picture shows the original gears above and the brass replacements below, they are wider but there is plenty of room to get them in. Not only does it fix the problem but most of these locos have a "limp", particularly in reverse, these gears seem to cure that as well.
Std Gauge WD Simplex !
Yes, there were a few and the Wrightlines kit seems tailor made for this conversion. The chassis is a variant of the one designed for the Wickham Trolley but with a smaller motor and my 13:1 gears. With the O ring drive it has 33:1 ratio and twin flywheels so is very good at low speed. The only mods required to the body are to trim off the rivets on the axle boxes so they don't rub on the backs of the wheels and to open out the axle slots to clear the brass spacers behind the wheels. My body has already had material removed to fit a 16.5mm unit but most of this is not necessary with the std gauge one. I can make these to order for the usual price of £70.00 RTR, it is a good fit between the inner ribs and stays there without any other form or retainers.
This was requested by a customer and worked perfectly first time, it might also be of interest to those modelling in 3ft, 3ft 6in or 1M gauge as the axles can be shortened to those gauges, it cannot be used for gauges less than 3ft due to the width of the chassis. Despite the O ring being inboard it can still be replaced fairly easily by removing one wheel and freeing up the gear with heat from a soldering iron, this will allow the axle to slide sideways enough to get the new O ring in, about 10 minutes to replace it.
Experiments with radio control
I have been asked several times whether my motors work with on board battery radio control and even if I would consider stocking parts, as they can be a bit hard to obtain in some countries. Knowing very little about it I did some research and came out of it with a head full of facts and figures, none of which were much use in everyday life. The best way was to buy enough parts for a couple of locos and try it out.
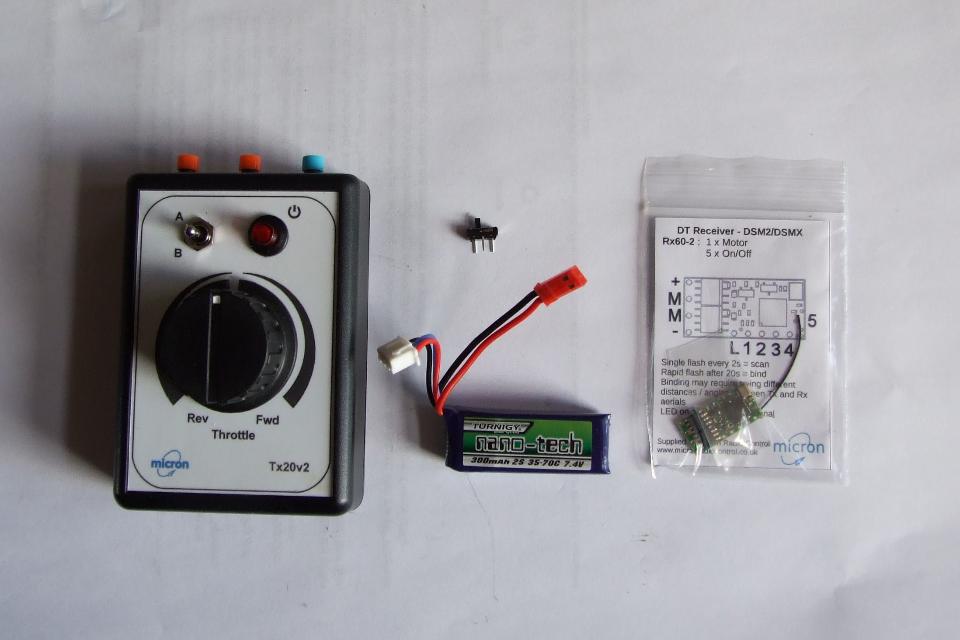
Below is a picture of the basic parts required for one loco, a transmitter/controller that can run any number of locos one at a time, a receiver chip, a battery, a charger (not shown) and an on/off switch. There are many sizes of battery and in different voltages, a LiPo cell is 3.7v and is known as a 1S, 2 cells together (2S) are 7.4v and there are others up to 6S, the 2S batteries are best suited to railway use as with 12v motors as the 3S batteries are all too big to fit, so I bought 2 x 300 mAh 2S batteries. The black/red wires are the power and the black/blue/red are the charging connections, the charging lead needs to be accesible so I bought some charging lead extenders to connect to the charger.
I chose a chunky diesel as a starting point and the battery was too big, a quick search got me 2 x 180mAh batteries which did fit, I also bought some power lead extensions and sone universal plugs and sockets in case I needed to contrive some connections. The wiring is simple, 2 leads from the chip to the motor and another 2 from the chip to the battery, via an on/off switch, how hard could it be?
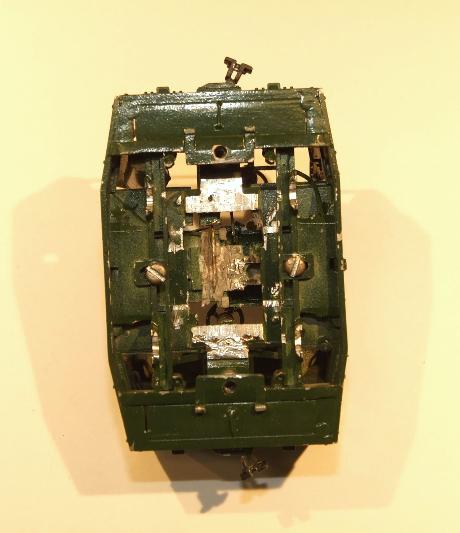
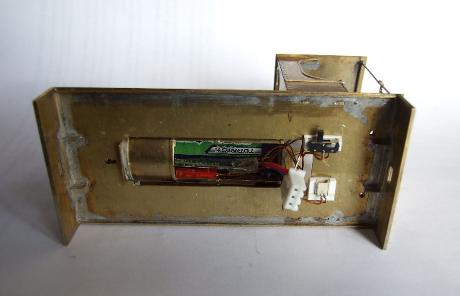
I decided the best way to get it all in a nice square bonnet was to create a frame from plastic section glued to the chassis, all the parts would have to fit in the outline of this frame, which they did, and sellotape was wrapped around the outside to keep the bits in place. The battery sat on top of the motor with the chip at one side, the switch wedged nicely between the frames under the cab which just left the charging plug.
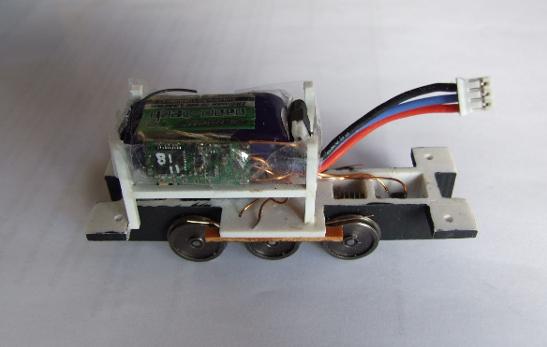
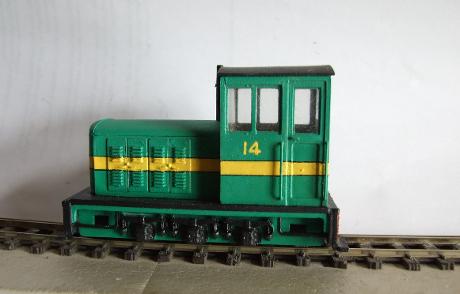
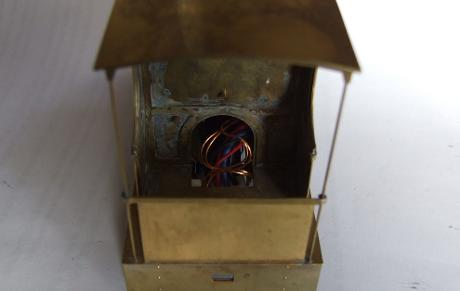
There was no way to attach it to the frames in a convenient place so a hole was made into the cab and the cable is fed through the hole when the chassis is fitted, the cable curls up on the floor and can be accessed by removing the roof. It worked fine and as there is no power loss via pickups and track, all the available power can be used and 7.4v is more than enough. Also I went out into the street to see what the range was and it was still responding when I was no longer able to see it, at least 25M away. Below is the cable on the cab floor and the reassembled and working loco, the colours are Indonesian sugar mill, very garish. Low speed performance is as good as the mechanism can manage, the better your chassis, the better it runs. Battery life, I have no idea but I am still on the charge that came in the new battery. I am told that 300mAh is the best size to use and will last all day but others say just fit the biggest you can, they recharge quickly.
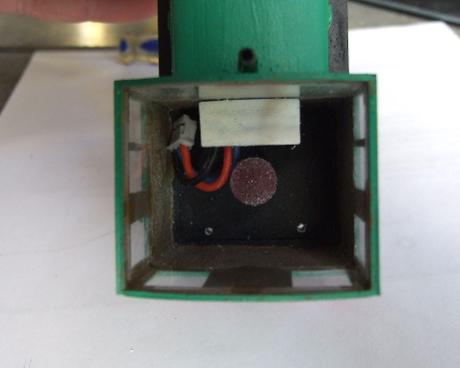
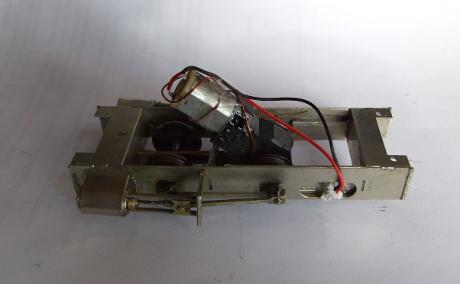
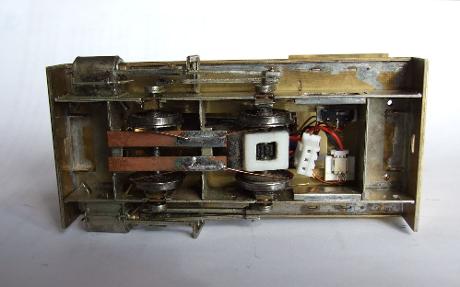
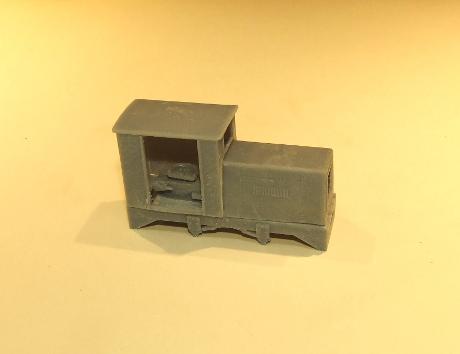
As a second experiment I fitted another set into my test build 1/35th Peckett, this time there was room for the bigger battery. Fitting it all to the chassis was not an option in this case so the parts were all fitted into the body with a plug connection to the motor. Below left shows the battery and chip in place, the chip is in its plastic sleeve this time as there is a lot of bare metal around. Also visible are the on/off switch and motor lead socket, both on home made plastic holders and the charging plug. Below right shows the motor leads and plug, the other wires are from the pickups that have not been removed.
Below is a picture of it all assembled, the switch is close to the frames and must be operated with a screwdriver, the motor lead is plugged in. On the right is the mess of wires that will disappear when the firebox if fitted. The charging socket just dangles behind the motor, its easy to get to but will not foul the track. The main reason to try this one was to see if a metal body had any effect on the radio signal, none at all as far as I can tell. Running is much the same as the diesel and the range also seems unaffected by a metal body.
The Verdict
Overall I spent about £150 on the parts and have 2 running locos and batteries, switches and cables left over. Ease of fitting is a bit worse than wiring DCC but of course you don't need a live track and dirty wheels or pickups have no effect as they are dead electrically. This is a good alternative to DCC, a much lower initial outlay, a bit less per loco and no computer knowledge required. There are programmable functions which I have read about but not yet explored, directional lights, electric couplings, the ability to operate a sound card and to run several locos on different channels, now I have 2 I will have to try that one. Annoyingly the small batteries are hard to get and only half the price of one with 10 times the capacity, a larger battery could be used with it in a tender but I only have 1 tender loco. Another benefit I haven't tried is to use coreless motors, as they use less than half the power of a brushed motor and work best on pure DC, they are ideally suited to this and I have acquired 3 sizes to test out, obviously the battery will then last more than twice as long in use.
If anyone interested will get in touch with a list of requirements, or just questions, I will do my best to help. I have ordered some chips from China, the good thing about modern 2.4Ghz systems is that they are all compatible. If they work out I will be able to supply batteries, switches, cables, chips and chargers, the transmitters are best bought from Micron direct but I could supply these as well. The only work required here is to fit it in your loco so don't hope for a system that will fit in a OO9 Ruston.
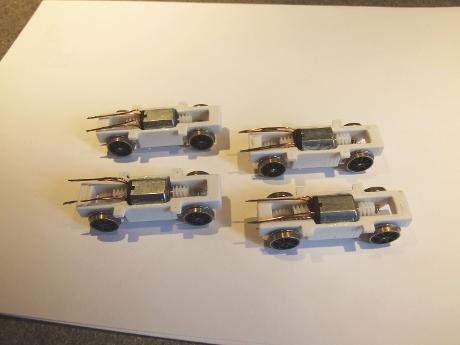
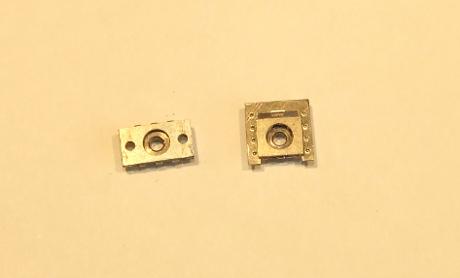
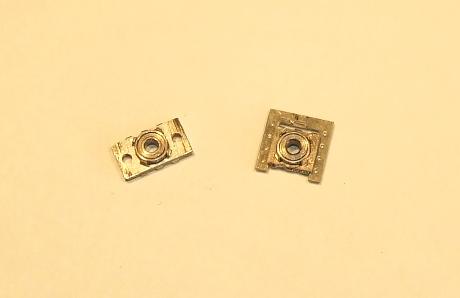
New double gearedpower bogie
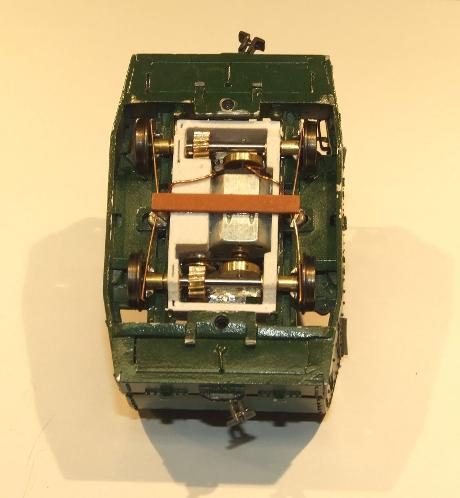
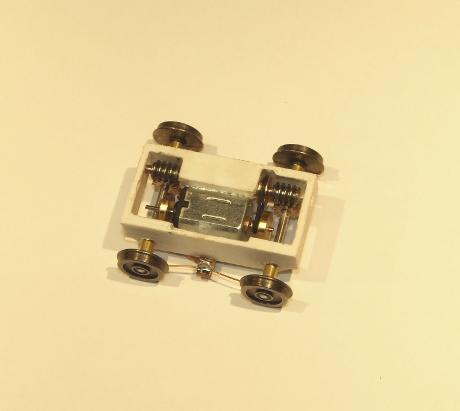
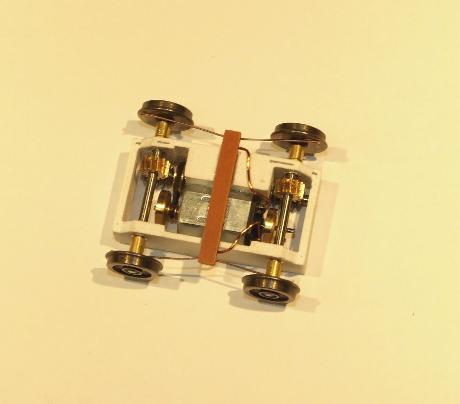
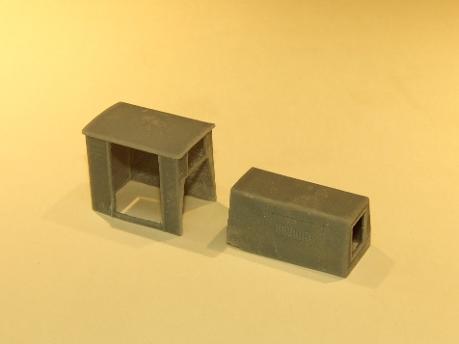
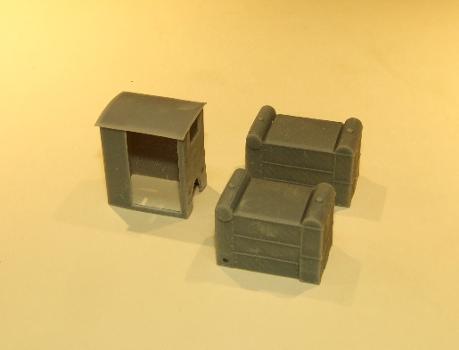
This one was built as an experiment to get an underfloor unit but keep dual gearing. They uses Chinese nylon 0.5M gears and an N20 motor, the gear ratio is 32:1 and both have 12mm wheels and run superbly. One was built with the motor flat sides outward and is 15mm above rail height with the motor an extra 3.5mm above this, the other has the motor turned flat sides up and down and the intermediate gear shafts lowered by 1mm so the motor is only 1.5mm higher. The height measurements will be almost 1mm lower with 10.5mm wheelsand are the same as a Tenshodo unit. Please ignore the curved tops, the printer was having a bad day and I couldn't be bothered to sweet talk it for 2 test prints.

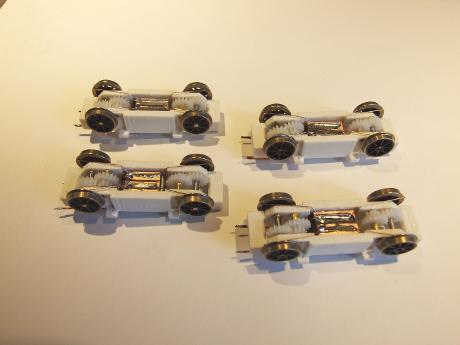
Below on the left is the one with the higher motor, on the right is the one with the motor turned flat side up, note that it had to be made wider and the gears underneath protrude 1mm further, but are still well clear of the track. In the top and bottom views below you can see the gears, the different aspects of the motor and the wider body of the lower one. My normal wiring doesn't work well with this configuration as there are too many gears to dodge, next time the wiring will be mostly above.
There are limitations to what is possible with these, minimum wheelbase 38mm, gauge 16.5mm or wider, wheels 10.5mm or bigger and I can't make them any lower until a source of smaller gears appears, which is unlikely. I can change the body length and add extensions to attach them or to fit dummy outside frames.
These will not be stocked and made to order only at £70.00 each
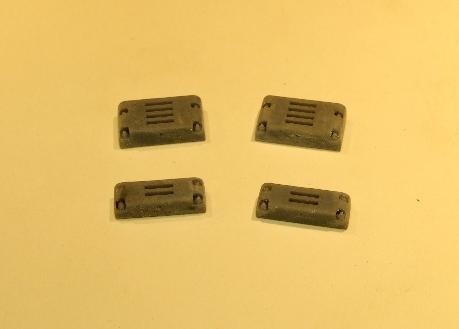
The 4 below were made for a guy in South Africa and are 16.5mm gauge with the wiring above for DCC connections. They cost a little more as they have Scale Link spoked wheels. I also added 4 lugs near the wheels for attaching to the body.
Ruston Hornsby diesels
A friend has been after a 48DL for some time now and despite 3 attempts to buy a Wrightlines one he is still without one, so I thought I could print one to fit on my larger diesel chassis.
4 bases with 16.5mm atthe back
40/48DL slope sided bonnet and cab
40/48DL YC engine bonnet and cab
Early cab with long and short bonnets
4 and 2 slot couplers
I started with the 1943 48DL as requested but found there were 2 different bonnets, slope sided and the angled one for the YC engine, so I did both with their matching cabs. I then found out that the one he was lusting after was actually a 1946 40DL, exactly the same but with a shorter bonnet as the engine was smaller, no problem, just chop off 3mm and use the 48DL parts.
I then realised that the base on the earlier versions was the same as the later but with earlier axleboxes so I drew those and started on the earlier bodywork. The 36/42 and 44/48 from the mid 30s were again the same on the outside but the 33/40 had a shorter bonnet but at least all 3 used the same cab.
I originally drew the base with couplers attached but had distortion problems during printing, the solution was to remove the couplers and print them separately so I added 2 and 4 slot couplers to the list of parts. The bare chassis ends had Kadee slots cut in them for users of these but those wanting Ruston couplers just glue the printed ones on the ends to hide the slots.
All parts have attachment points that need to be cleaned off with files or abrasive paper, on the cabs and bonnets they are mostly inside so very little needs to be done, on the bases I had to print them upside down so the attachment points are on the top but as its mostly flat it can be filed easily. Almost all of the top is either in the cab or bonnet so very little actually shows on the finished model. Assembly of the printed parts is with super glue and a few bits of ire will be required to make handles and levers. Some mesh will be supplied for radiator grills.
The base is too narrow for 16.5mm so 2 types had to be made, the bare base for gauges of 14mm or less and the one with the side extenders for 16.5mm, just as Ruston planned. The chassis is built as it comes with no changes and just slots in from below. It comes with a flywheel and drives both axles, the gearing is around 33:1. It is easy to build and can be done with glue, although soldering the wiring and bushes might be a good idea.
These are available now at £80 for any variant and I can offer the chassis built for an extra £40
I will be adding the 20 and 30 DL and the 18/2, 16/20, 22/28 and 25/30 at a later date but new bases are required for these.
Below are some pictures of the various types, none are actually glued together, the parts are just balanced in place. Top left is a slope sided 48DL and below that is a YC engined 40DL. Top right is a 33/40 and below it a 44/48 or 36/42. At the bottom are pictures of the chassis under and next to a base, in both pictures the left one is 14mm and the right is 16.5mm.
24-11-2020 The Alco is finally available
I have shipped about 8 so far and will be sending more in the next few days. As I have ordered parts for 40 there will be enough to last a while. The WD ones are available immediately but the Mountaineers will be delayed a few days due to a printer malfunction, I have no idea what the problem was, the printer had no idea either but it seems to have got over it and is printing happily now.
03-12-2020 Around 18 have been sent out with at least 2 waiting for other bits before posting. As I ordered 40 of everything there are still 20 or so left and the printer is behaving itself after I gave it a good talking to. If anyone wants the printed parts in a different scale I can do that easily, I have already sold 2 sets in 1/32nd scale.
Full details on the Loco and chassis kits page.
05-12-2020 An Apology
I must apologise to all who have bought the Mountaineer version of the Alco, it seems I got the boiler completely wrong as I based it on the WD one. It seems that early Mountaineer had the WD boiler until it was replaced with a larger one in 1982. The boiler/tank assembly also doesn't like being posted and several have arrived damaged and with warped parts. Therefore the bodywork will be having a remake over the next few weeks, the smokebox will be removed from the boiler for printing separately which will cure the base that prints poorly, the tanks will have the supports attached to them and will plug into the boiler for assembly by the customer, this will be more accurate and solve the warping and posting problems. Mountaineer will have a new boiler in the same fashion but this will take a few weeks as the parts have to be drawn, test printed, modified and retested as I don't want this happening again. The WD versions are fine as they are but will also get a few tweaks in the process, particularly to the tank mountings.
I will be replacing any parts required when they are available and emailing those that bought Mountaineer as that is affected most. I am really sorry about this as its the first real glitch I have had with a kit and it will be put right at my cost. The main reason behind it is that the kit was delayed with etch problems for a long time and the bodywork drawings were done 9 months ago. So much time and effort was put into sorting out the chassis that the bodywork didn't get the attention it needed. My fault entirely.
Since I know who has bought the kits, you don't need to call me until I announce here that the new parts are ready, and I will probably be calling you first to say they are on the way.
24-02-2021
I have replacement body parts available for the WD Alco, some have gone ahead with the old parts but anyone who wants them can email and I will send a set. The Mountaineer version is still under review and may be some time.
15-08-2021
I have decided not to go ahead with the later Mountaineer version of the Alco for several reasons, the main ones being the cost and time needed. I only sold 4 of this type so I am offering a full refund if the kit is returned or a £140 refund if the kit is retained to use the chassis under a scratch built body. To rectify the faults it would need new resin parts for the boiler, which was replaced at some point, the tanks, which have different and higher mountings and a new smokebox and saddle. The etched cab would need redoing from scratch and several extra brass castings would be required. Paul Holmes kindly supplied me with many pictures of Mountaineer in Boston Lodge which only served to show how much was missed on the original design. It is just not worth the time and money for 4 existing customers with no guarantee of further sales.
The WD version is fine as it is with the new prints and also the early angular version of Mountaineer, which was basically a modified WD version before the boiler was replaced.
These are now available from stock at £50.00 as from 20-09-2020 and they are really easy to build so I will do RTR ones at £90.00, your choice of gauge, wheelbase, wheels and motor.
Water pick up Hoses
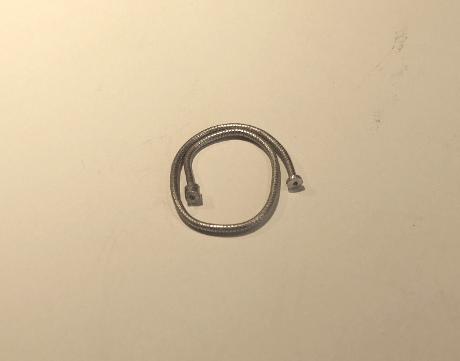
A solution at last for the water pick up hoses that were draped on various parts of WD locos. Its 12 cm long and 1.5 mm thick and made from solder with a can on one end and a flange on the other. The hose part is textured by rolling to look more like a reinforced canvas hose.
Now available at £3.00 each
If anyone wants a different length, I can make them to order.
Wrightlines De Winton chassis
A replacement chassis for this has been an intention for a while so I borrowed a body kit from Robin Edwards to see what could be done. I hoped to use the cranks and rods supplied in the kit with a newly acquired L shape geared motor. As you can see from the pictures it worked but there were issues, aren't there always.
The body kit is designed with a 30mm wb, the Tenshodo that used to be used was 31mm wb, which caused some fun and games during assembly. The rods on this kit were 30 and 31mm wb, one of each due to casting tolerances, on top of that the holes are slots. I printed the chassis with a 30mm wb to fit the body and manually filed the slotted rod ends to suit and soldered in some fine tube. The same tube was used as retainers to hold the rods in place. The cranks were drilled out to 2mm and fitted with threadlock, the quartering was done by eye. Amazingly it worked first time and is powerful with good slow speed performance, which is all that is needed on a De Winton.
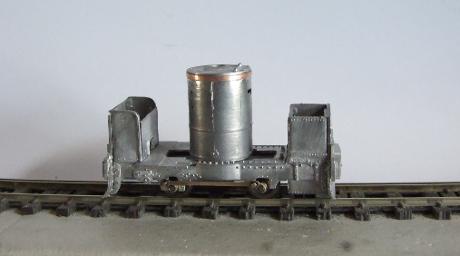
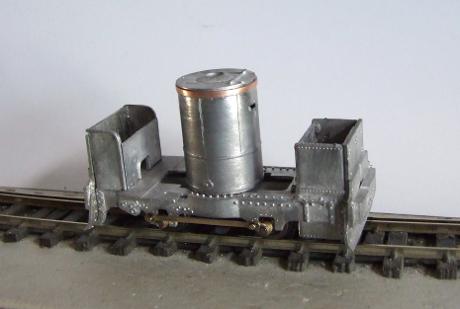
Above are 2 views of the test chassis using the cranks and rods from the kit, the copper strip around the top of the boiler is a 1.5mm wire ring soldered on and filed flat. This raises the top for motor clearance without moving any of the boiler mounting points.
The gearbox is around 80:1 ratio in 4 stages, the motor is a K20 but 7.5v and requires a ballast resistor. The center of the boiler base needs removing to fit the motor through. The kit uses a tube through the boiler that fits into a central holder at the base to represent the chimney, as the motor is in the way, the chimney tube will need shortening to be just the visible part above the boiler.
This is a 14mm version and due to the tight clearances the chassis and gearbox uses common bushes, gauges less than 14mm are not possible. The 16.5mm version will use separate bushes. Wheels are my 10.5mm disc type with simple wiper pick ups.
I can make these to order but RTR only and the buyer will need to sort out the cranks and rods. At a later date I can draw rods, cranks and a crank setting jig to assemble it all but not until after the lock down as the etchers are closed for the duration. The chassis would be supplied now as you see above, with extended axles but no rods or cranks at a price of £50.00. When I do an improved version with rods etc the price would be around £85.00 assembled.
Hornblocks and bearings
Two all new items for kit and scratch builders, roller bearing hornblocks and bracket bearings. They assemble from a folding etch with a 2mm bore ball race which is held in tiny fingers and araldited in place. The left one in each picture is the bracket bearing, suitable for motorised accessories or any loco with a motor mounted remotely from the gearbox and needing a bearing. The size is 11 x 6mm and depth 2.4mm, the holes are 1.2mm spaced at 8mm. The hornblocks are on the right and fit straight into standard 6mm frame cutouts, a guide is supplied for either functional or cosmetic use. There is a fold up tag to set the height in the frame cutout and/or limit the travel as may be required. Both use 5 x 2mm double shielded ball races with a 2mm bore and have vastly less friction than a similar sized bush with no need to lubricate ever.
When fitting, the axle must be a push fit through the bearings and is locked in place with a tiny spot of bearing lock when positioned. If the axle is a bit tight, it can be eased by spinning in a drill or lathe and fine abrasive paper used to reduce the diameter a fraction. I an now fitting these ball races in my motor bogies as standard and they greatly improve performance.
Supplied in pairs of either type at £4.00 for 2mm axles only and yes I can supply spare bearings if needed.
Controller Issues
I have recently had some failures of the small motors used in my Universal Power Bogie, this motor is a Chinese 11/8 can motor. I have sold well over 50 of these as kits and RTR and have had to replace 2 motors for customers and 3 for myself. A customer asked if the controller might be an issue so I ran his repaired chassis 6 times up and down my 6ft test track using my pulse width modulated controller, it ran well and got a bit warm. I then repeated it with my Gaugemaster type D and it didn't run as well and got quite hot.
I called Gaugemaster to discuss this and was told that all Gaugemasters are only half rectified and have no inbuilt power restrictions, this gives a raw output that small motors don't like, the larger ones can cope as they are a bigger heat sink but it will probably still shorten their life. When the motor gets hot, which it will do on half rectified power, it will keep getting hotter until it burns out and there are no power limiters to stop this. This was a bit of a surprise as I thought the problem was the Chinese motor suppliers lack of quality control when it looks like it was my Gaugemaster all the time.
Therefore I cannot recommend my smallest motors for use with Gaugemasters or any other half rectified controller. I have done some research and found that PWM controllers should heat motors more than plain rectified one but half rectified controllers heat them even more. Suitable controllers are any controller using full rectification which includes the Hornby R965, HM200, the Tech4 range, most H&Ms with the wave switch in the full position and any make of hand held unit so long as it is supplied from a fully rectified DC supply, not from AC as then the inbuilt half wave rectifier will take over.
Sorry for this but I have no say in how manufacturers design their controllers. If you have a controller that you are unsure about, ask the manufacturer, if it uses full rectification it will be fine, if its a hand held, use a fully rectified DC supply, if its an old one that's no longer made, ask others on forums, try Google or ask me.
Panama Canal Franco Belge 0-4-0T
This kit has been on hold for a while as the rush due to Covid 19 and the panic to get the Alco ready both took over. I have done absolutely nothing to it since early this year but I will be getting to it some time soon. The etches I have are good to go but they only cover the body and basic chassis, I needed to build this before I tackled the valve gear and that is the next stage, followed by the castings.
Other scales
Redlake coach
Now available in 5.5mm gauge for 16.5 mm track
Brush 4WBE
I can now supply this in 1/32nd or 1/35th scales, that's the best bit of 3D printing, just scale it up or down and print.
Barclay E class chassis
It has been pointed out to me that my Barclay chassis which is 7mm or 1:43 scale will actually make quite a good chassis for an O&K tank loco or similar in 1:35 scale. Well, I didn't see that one coming but in 16.5mm form it certainly will. I will have to try it myself.
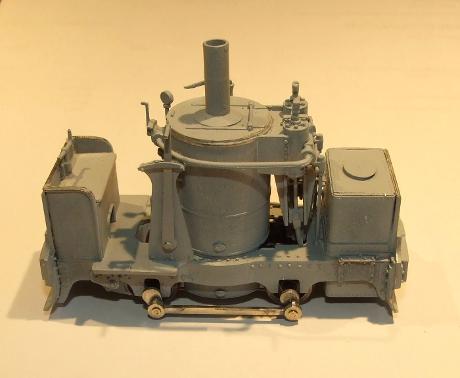
Smallbrook ETNA
I bought an unknown vertical boiler loco body thought to be 1/35th scale on Ebay, it turned out to be a 7mm scale ETNA by Smallbrook Studios. Rather than use a Smokey Joe chassis, I printed one to fit and used my larger geared motor, 16mm spoked wheels and rods and cranks borrowed from one of my Pecketts. The result was surprisingly good, except that its more suited to 1/35th or 1/32nd scale. Its sort of an adaption of a De Winton but much bigger to fit the Hornby chassis.
If anyone has an Etna that they would like to use for whatever scale but need a better chassis, I can build these to order. You get Scalelink 16mm spokedwheels and around 140:1 gearing with an N20 motor. The drive is smooth and silent and very good at slow speeds. These are RTR only at £90.00 and take around 10 days to supply as I make the outside rods to order.
New itemsFor Sale
Bagnall P51 4WPM
This is a print from Tom Bell of Teebee models from Shapeways for which I printed a chassis for 14mm. Its not wide enough for 16.5mm so can only be gauged from 14 to 12mm but I can make achassis for 10.5 or 9mm if required.
Cost in any gauge is £90 as the loco is fairly large and the print is around £36 on its own.
Paint not included.
New gears, pulleys and wheels
These have finally arrived from China and they have surpassed my expectations.
The gears are so well cut that they need no running in and just work perfectly from first fitting. They are 0.4 module 13:1 ratio, the gear is small enough to use with 8.5mm wheels and the worm is actually 2mm longer than the ones in the picture, they were a test sample. Both have 2mm tight push fit bores to suit my power bogies where they will be standard fitting from now on.
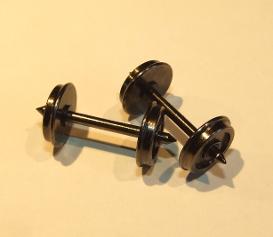
The wheels are 10,5mm blackened steel but still conduct electricity, on turned plastic bushes with 2mm brass pin point, brass blind or steel blind axles. They are supplied loose so that I can choose the axle and they push on dead square every time, unlike some plastic centered wheels I have had to use lately. They are also perfectly concentric as they are CNC machined. I have these wheels in 12 and 14mm now at the same price.
The pulleys are much as my previous ones, no real changes there. The large one is bored 2mm and the small one 1mm, ratio around 2.8:1.
All these are available separately, a gear set £3.50, 2 pulleys with 2 O rings £2.50 and wheels £2.50 per axle.
The bottom picture shows the new wheels at the back, my previous ones in the middle and Gibsons at the front for comparison.
Axle bushes
As I need a lot of these for kits etc, I had a batch of 10,000 made in China, I can supply standard 1/8th bushes, large 2mm bushes, same as the 1/8th ones but with a 2mm hole, standard 2mm bushes and extended 2mm bushes, same as standard but longer. I can supply these in any quantity 12 or above.
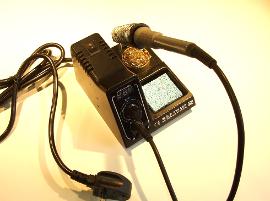
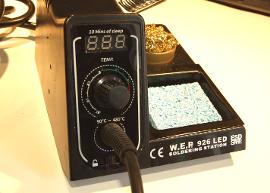
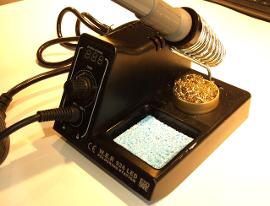
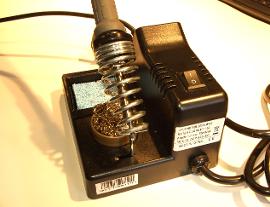
WEP Soldering Station
Found by chance while looking for something else on Chinese websites. It turns out to be the best iron I have ever owned, mine has been in use for over a year now and I still can't fault it.
Its 60Wand variable from 90 to 420 degrees with a temperature lock switch to avoid accidental adjustment, has the fastest warm up time I have ever seen, 0 to 360 degrees in around 20 seconds, It also does not loose temperature when soldering, even on a large piece with the biggest bit.
It comes with a sponge tip wiper, a brass shavings tip cleaner, a solder reel support (not shown), 5 assorted bits and has a sleep function that lowers the temperature after 10 minutes of inactivity. Extra spare bits are universal to most Chinese irons and come in packs of 11.
I have sold several now and highly recommend them. The irons come from a European warehouse so supplies are quick but the bits come from China and can take a month to arrive so I try to keep a few packs in stock.
The wholesaler has increased the price of the station by £3.00 so I have had to as well, sorry about that.
WEP Soldering Station £45.00, 11 bits £10.00
Soldering Station with 11 extra bits £53.00
I now keep replacement elements for this iron at £10.00 each.
They last a long time but I thought it best to keep a few in stock as they have to come from China and can take a few weeks to arrive.
Locosnstuff is owned by Mark Clark at 12 Adelaide Road, Gillingham, Kent, ME7 4NJ, UK
I can be contacted at borsig1958@gmail.com any time or on 01634 575081 before 8pm
Make a free website with Yola